Containers
Containers
Podman Podman Podman
Podman Podman Podman
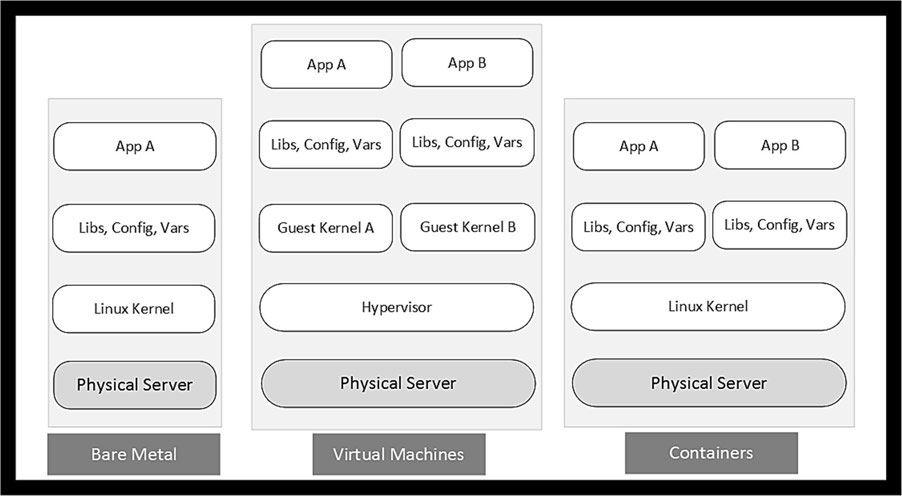
Traditional server/ application deployment:
Container Model:
Developers can now package their application alongside dependencies, shared library files, environment variables, and other specifics in a single image file and use that file to run the application in a unique, isolated “environment” called container.
A container is essentially a set of processes that runs in complete seclusion on a Linux system.
A single Linux system running on bare metal hardware or in a virtual machine may have tens or hundreds of containers running at a time.
The underlying hardware may be located either on the ground or in the cloud.
Each container is treated as a complete whole, which can be tagged, started, stopped, restarted, or even transported to another server without impacting other running containers.
Any conflicts that may exist among applications, within application components, or with the operating system can be evaded.
Applications encapsulated to run inside containers are called containerized applications.
Containerization is a growing trend for architecting and deploying applications, application components, and databases in real world environments.
Control Groups (cgroups)
Namespaces
Secure Computing Mode (seccomp) and SELinux
Containers
container image
Essentially a static file that is built with all necessary components (application binaries, library files, configuration settings, environment variables, static data files, etc.)
Required by an application to run smoothly, securely, and independently.
RHEL follows the open container initiative (OCI) to allow users to build images based on industry standard specifications that define the image format, host operating system metadata, and supported hardware architectures.
An OCI-compliant image can be executed and managed with OCI-compliant tools such as podman (pod manager) and Docker.
Images can be version-controlled giving users the suppleness to use the latest or any of the previous versions to launch their containers.
A single image can be used to run several containers at once.
Container images adhere to a standard naming convention for identification.
This is referred to as fully qualified image name (FQIN).
Images are stored and maintained in public or private registries;
They need to be downloaded and made locally available for consumption.
There are several registries available on the Internet.
The three Red Hat registries may be searched using the Red Hat Container Catalog at catalog.redhat.com/software/containers/search.
Additional registries may be added as required.
Private registries may also require authentication for access.
Containers can be launched with the root user privileges (sudo or directly as the root user).
This gives containers full access to perform administrative functions including the ability to map privileged network ports (1024 and below).
Launching containers with superuser rights opens a gate to potential unauthorized access to the container host if a container is compromised due to a vulnerability or misconfiguration.
To secure containers and the underlying operating system, containers should be launched and interacted with as normal Linux users.
Such containers are referred to as rootless containers.
Rootless containers allow regular, unprivileged users to run containers without the ability to perform tasks that require privileged access.
container-tools that consists of all the required components and commands.dnf command to install the package.1. Install the container-tools package:
 root@server10 ~]# dnf install -y container-tools

 Upgraded:
  aardvark-dns-2:1.10.0-3.el9_4.x86_64
  buildah-2:1.33.7-3.el9_4.x86_64
  netavark-2:1.10.3-1.el9.x86_64
  podman-4:4.9.4-6.el9_4.x86_64
 Installed:
  container-tools-1-14.el9.noarch
  podman-docker-4:4.9.4-6.el9_4.noarch
  podman-remote-4:4.9.4-6.el9_4.x86_64
  python3-podman-3:4.9.0-1.el9.noarch
  python3-pyxdg-0.27-3.el9.noarch
  python3-tomli-2.0.1-5.el9.noarch
  skopeo-2:1.14.3-3.el9_4.x86_64
  toolbox-0.0.99.5-2.el9.x86_64
  udica-0.2.8-1.el9.noarch
2. Verify the package installation:
 [root@server10 ~]# dnf list container-tools
 Updating Subscription Management repositories.
 Last metadata expiration check: 14:53:32 ago on Wed 31 Jul 2024 05:45:56 PM MST.
 Installed Packages
 container-tools.noarch   1-14.el9    @rhel-9-for-x86_64-appstream-rpms
podman Commandbuild
images
inspect
login/logout
pull
rmi
search
--no-trunc option makes the command exhibit output without truncating it.--limit <number> option limits the displayed results to the specified number.tag
attach
exec
generate
--new option is important and is employed in later exercises.info
inspect
ps
rm
run
start/stop/restart
skopeo Commandinspect subcommand to examine the details of an image stored in a remote registry./etc/containers/registries.conf
 [root@server10 ~]# grep -Ev '^#|^$' /etc/containers/registries.conf
 unqualified-search-registries = ["registry.access.redhat.com", "registry.redhat.io", "docker.io"]
short-name-mode = "enforcing"podman command searches these registries for container images in the given order.Add a private registry called registry.private.myorg.io to be added with the highest priority:
[root@server10 ~]# vim /etc/containers/registries.conf unqualified-search-registries = \["registry.private.myorg.io",
"registry.access.redhat.com", "registry.redhat.io", "docker.io"\]If this private registry is the only one to be used, you can take the rest of the registry entries out of the list:
unqualified-search-registries = \["registry.private.myorg.io"\]EXAM TIP: As there is no Internet access provided during Red Hat exams, you may have to access a network-based registry to download images.
uname -rto obtain the kernel version, and so on.info subcommand shows all this information.Here is a sample when this command is executed as a normal user (user1):
 [[user1@server10 root]$ podman info
 ERRO[0000] XDG_RUNTIME_DIR directory "/run/user/0" is not owned by the current user](<[user1@server10 ~]$ podman info
 host:
  arch: amd64
  buildahVersion: 1.33.8
  cgroupControllers:
  - memory
  - pids
  cgroupManager: systemd
  cgroupVersion: v2
  conmon:
 ...
Re-run the command as root (preceded by sudo if running as user1) and compare the values for the settings “rootless” under host and “ConfigFile” and “ImageStore” under store.
The differences lie between where the root and rootless (normal) users store and obtain configuration data, the number of container images they have locally available, and so on.
 [root@server10 ~]# podman info
 host:
  arch: amd64
  buildahVersion: 1.33.8
  cgroupControllers:
  - cpuset
  - cpu
  - io
  - memory
  - hugetlb
  - pids
  - rdma
  - misc
...
Similarly, you can run the podman command as follows to check its version:
 [root@server10 ~]# podman version
 Client:       Podman Engine
 Version:      4.9.4-rhel
 API Version:  4.9.4-rhel
 Go Version:   go1.21.11 (Red Hat 1.21.11-1.el9_4)
 Built:        Mon Jul  1 03:27:14 2024
OS/Arch: linux/amd64Container images
podman and skopeo—is employed for these operations.1. Log in to the specified Red Hat registry:
[user1@server10 ~]$ podman login registry.redhat.io2. Confirm a successful login:
[user1@server10 ~]$ podman login registry.redhat.io --get-login3. Find the mysql-80 image in the specified registry. Add the
--no-trunc option to view full output.
 [user1@server10 ~]$ podman search registry.redhat.io/mysql-80 --no-trunc
 NAME                                     DESCRIPTION
 registry.redhat.io/rhel8/mysql-80        This container image provides a containerized packaging of the MySQL mysqld daemon and client application. The  mysqld server daemon accepts connections from clients and provides access to content from MySQL databases on behalf of the clients.
...
4. Select the second image rhel9/mysql-80 for this exercise. Inspect the image without downloading it using skopeo inspect. A long output will be generated. The command uses the docker:// mechanism to access the image.
 [user1@server10 ~]$ skopeo inspect docker://registry.redhat.io/rhel9/mysql-80
 {
    "Name": "registry.redhat.io/rhel9/mysql-80",
    "Digest": "sha256:247903d2103a3c1db9401f6340ecdcd97c6244480b7a3419e6303dda650491dc",
    "RepoTags": [
        "1",
        "1-190",
        "1-190.1655192188",
        "1-190.1655192188-source",
        "1-190-source",
        "1-197",
        "1-197-source",
        "1-206",
...
Output:
Shows older versions under RepoTags
Creation time for the latest version
Build date of the image
description
other information.
It is a good practice to analyze the metadata of an image prior to downloading and consuming it.
5. Download the image by specifying the fully qualified image name using podman pull:
 [user1@server10 ~]$ podman pull docker://registry.redhat.io/rhel9/mysql-80
 Trying to pull registry.redhat.io/rhel9/mysql-80:latest...
 Getting image source signatures
 Checking if image destination supports signatures
 Copying blob 846c0bdf4e30 done   |
 Copying blob cc296d75b612 done   |
 Copying blob db22e630b1c7 done   |
 Copying config b5782120a3 done   |
 Writing manifest to image destination
 Storing signatures
 b5782120a320e5915d86555e661c357cfa56dd8320ba4c54a58caa1e1c91925f
6. List the image to confirm the retrieval using podman images:
 [user1@server10 ~]$ podman images
 REPOSITORY                         TAG         IMAGE ID      CREATED      SIZE
 registry.redhat.io/rhel9/mysql-80  latest      b5782120a320  2 weeks ago  555 MB
7. Display the image’s details using podman inspect:
 [user1@server10 ~]$ podman inspect mysql-80
 [
     {
          "Id": "b5782120a320e5915d86555e661c357cfa56dd8320ba4c54a58caa1e1c91925f",
          "Digest": "sha256:247903d2103a3c1db9401f6340ecdcd97c6244480b7a3419e6303dda650491dc",
          "RepoTags": [
               "registry.redhat.io/rhel9/mysql-80:latest"
          ],
8. Remove the mysql-80 image from local storage:
 [user1@server10 ~]$ podman rmi mysql-80
 Untagged: registry.redhat.io/rhel9/mysql-80:latest
Deleted: b5782120a320e5915d86555e661c357cfa56dd8320ba4c54a58caa1e1c91925f9. Confirm the removal:
 [user1@server10 ~]$ podman images
REPOSITORY TAG IMAGE ID CREATED SIZEInstructions that may be utilized inside a Containerfile to perform specific functions during the build process:
CMD
COPY
ENV
EXPOSE
FROM
RUN
USER
WORKDIR
A sample container file is presented below:
[user1@server10 ~]$ vim containerfile # Use RHEL9 base image
FROM registry.redhat.io/ubi9/ubi
# Install Apache web server software
RUN dnf -y install httpd
# Copy the website
COPY ./index.html /var/www/html/
# Expose Port 80/tcp
EXPOSE 80
# Start Apache web server
CMD ["httpd"]1. Log in to the specified Red Hat registry:
 [user1@server10 ~]$ podman login registry.redhat.io
 Authenticating with existing credentials for registry.redhat.io
 Existing credentials are valid. Already logged in to registry.redhat.io
2. Confirm a successful login:
[user1@server10 ~]$ podman login registry.redhat.io --get-login3. Create a file called containerfile with the following code:
[user1@server10 ~]$ vim containerfile2 # Use RHEL9 base image
FROM registry.redhat.io/ubi9/ubi
# Count the number of characters
CMD echo "RHCSA exam is hands-on." | wc
# Copy a local file to /tmp
COPY ./testfile /tmp4. Create a file called testfile with some random text in it and place it in the same directory as the containerfile.
 [user1@server10 ~]$ echo "boo bee doo bee doo" >> testfile
 [user1@server10 ~]$ cat testfile
 boo bee doo bee doo
5. Build an image by specifying the containerfile name and an image tag such as ubi9-simple-image. The period character at the end represents the current directory and this is where both containerfile and testfile are located.
 [user1@server10 ~]$ podman image build -f containerfile2 -t ubi9-simple-image .
 STEP 1/3: FROM registry.redhat.io/ubi9/ubi
 Trying to pull registry.redhat.io/ubi9/ubi:latest...
 Getting image source signatures
 Checking if image destination supports signatures
 Copying blob cc296d75b612 done   |
 Copying config 159a1e6731 done   |
 Writing manifest to image destination
 Storing signatures
 STEP 2/3: CMD echo "RHCSA exam is hands-on." | wc
 --> 4c005bfd0b34
 STEP 3/3: COPY ./testfile /tmp
 COMMIT ubi9-simple-image
 --> a2797b06a129
 Successfully tagged localhost/ubi9-simple-image:latest
 a2797b06a1294ed06edab2ba1c21d2bddde3eb3af1d8ed286781837f62992622
6. Confirm image creation:
 [user1@server10 ~]$ podman image ls
 REPOSITORY                   TAG         IMAGE ID      CREATED        SIZE
 localhost/ubi9-simple-image  latest      a2797b06a129  2 minutes ago  220 MB
 registry.redhat.io/ubi9/ubi  latest      159a1e67312e  2 weeks ago    220 MB
Output:
downloaded image
new custom image along with their image IDs, creation time, and size.
Do not remove the custom image yet as you will be using it to launch a container in the next section.
1. Launch a container using ubi8 (RHEL 8). Name this container rhel8-base-os and open a terminal session for interaction:
 [user1@server10 ~]$ podman run -ti --name rhel8-base-os ubi8
 Resolved "ubi8" as an alias (/etc/containers/registries.conf.d/001-rhel-shortnames.conf)
 Trying to pull registry.access.redhat.com/ubi8:latest...
 Getting image source signatures
 Checking if image destination supports signatures
 Copying blob 8694db102e5b done   |
 Copying config 269749ad51 done   |
 Writing manifest to image destination
 Storing signatures
 [root@30c7cccd8490 /]#
Downloaded the latest version of the specified image automatically even though no FQIN was provided.
Opened a terminal session inside the container as the root user to interact with the containerized RHEL 8 OS.
The container ID is reflected as the hostname in the container’s command prompt (last line in the output). This is an auto-generated ID.
If you encounter any permission issues, delete the /etc/docker directory (if it exists) and try again.
2. Run a few basic commands such as pwd, ls, cat, and date inside the container for verification:
 [root@30c7cccd8490 /]# pwd
 /
 [root@30c7cccd8490 /]# ls
 bin   dev  home  lib64	     media  opt   root	sbin  sys  usr
 boot  etc  lib	 lost+found  mnt    proc  run	srv   tmp  var
 [root@30c7cccd8490 /]# cat /etc/redhat-release
 Red Hat Enterprise Linux release 8.10 (Ootpa)
 [root@30c7cccd8490 /]# date
 Thu Aug  1 21:09:13 UTC 2024
3. Close the terminal session when done:
 [root@30c7cccd8490 /]# exit
 exit
 [user1@server10 ~]$
4. Delete the container using podman rm:
 [user1@server10 ~]$ podman rm rhel8-base-os
 rhel8-base-os
Confirm the removal with podman ps.
 [user1@server10 ~]$ podman ps
CONTAINER ID IMAGE COMMAND CREATED STATUS PORTS NAMES1. Start a container using ubi7 (RHEL 7) and run ls as an entry point command. Remove the container as soon as the entry point command has finished running.
 [user1@server10 ~]$ podman run --rm ubi7 ls
 Resolved "ubi7" as an alias (/etc/containers/registries.conf.d/001-rhel-shortnames.conf)
 Trying to pull registry.access.redhat.com/ubi7:latest...
 Getting image source signatures
 Checking if image destination supports signatures
 Copying blob 7f2c2c4492b6 done   |
 Copying config a084eb42a5 done   |
 Writing manifest to image destination
 Storing signatures
 bin
 boot
 dev
 etc
 home
...
2. Confirm the container removal with podman ps:
podman ps
CONTAINER ID IMAGE COMMAND CREATED STATUS PORTS NAMESpodman command.EXAM TIP: As a normal user, you cannot map a host port below 1024 to a container port.
1. Search for an Apache web server image for RHEL 7 using podman search:
 [user1@server30 ~]$ podman search registry.redhat.io/rhel7/httpd
 NAME                                      DESCRIPTION
 registry.redhat.io/rhscl/httpd-24-rhel7   Apache HTTP 2.4 Server
2. Log in to registry.redhat.io using the Red Hat credentials to access the image:
 [user1@server30 ~]$ podman login registry.redhat.io
 Username: tdavetech@gmail.com
 Password:
 Login Succeeded!
3. Download the latest version of the Apache image using podman pull:
 [user1@server30 ~]$ podman pull registry.redhat.io/rhscl/httpd-24- rhel7
 Trying to pull registry.redhat.io/rhscl/httpd-24-rhel7:latest...
 Getting image source signatures
 Checking if image destination supports signatures
 Copying blob fd77da0b900b done   |
 Copying blob 7f2c2c4492b6 done   |
 Copying blob ea092d7970b2 done   |
 Copying config 847db19d6c done   |
 Writing manifest to image destination
 Storing signatures
 847db19d6cbc726106c901a7713d30dccc9033031ec812037c4c458319a1b328
4. Verify the download using podman images:
 [user1@server30 ~]$ podman images
 REPOSITORY                               TAG         IMAGE ID       CREATED       SIZE
 registry.redhat.io/rhscl/httpd-24-rhel7  latest      847db19d6cbc  2  months ago  332 MB
5. Launch a container named rhel7-port-map in detached mode to run the containerized Apache web server with host port 10000 mapped to container port 8000.
 [user1@server30 ~]$ podman run -dp 10000:8000 --name rhel7-port-map  httpd-24-rhel7
 cd063dff352dfbcd57dd417587513b12ca4033ed657f3baaa28d54df19d4df1c
6. Verify that the container was launched successfully using podman ps:
 [user1@server30 ~]$ podman ps
 CONTAINER ID  IMAGE                                           COMMAND               CREATED         STATUS         PORTS                    NAMES
 cd063dff352d  registry.redhat.io/rhscl/httpd-24-rhel7:latest   /usr/bin/run-http...  36 seconds ago  Up 36 seconds  0.0.0.0:10000- >8000/tcp  rhel7-port-map
7. You can also use podman port to view the mapping:
 [user1@server30 ~]$ podman port rhel7-port-map
8000/tcp -> 0.0.0.0:10000podman subcommands and verify each transition.1. Verify the current operational state of the container rhel7-port-map:
 [user1@server30 ~]$ podman ps
 CONTAINER ID  IMAGE                                           COMMAND               CREATED        STATUS        PORTS                    NAMES
 cd063dff352d  registry.redhat.io/rhscl/httpd-24-rhel7:latest   /usr/bin/run-http...  3 minutes ago  Up 3 minutes  0.0.0.0:10000- >8000/tcp  rhel7-port-map
2. Stop the container and confirm.
(the -a option with ps also includes the stopped containers in the output):
 [user1@server30 ~]$ podman stop rhel7-port-map
 rhel7-port-map

 [user1@server30 ~]$ podman ps -a
 CONTAINER ID  IMAGE                                           COMMAND               CREATED        STATUS                    PORTS                    NAMES
 cd063dff352d  registry.redhat.io/rhscl/httpd-24-rhel7:latest   /usr/bin/run-http...  6 minutes ago  Exited (0) 5 seconds ago   0.0.0.0:10000->8000/tcp  rhel7-port-map
3. Start the container and confirm:
 [user1@server30 ~]$ podman start rhel7-port-map
 rhel7-port-map
 [user1@server30 ~]$ podman ps -a
 CONTAINER ID  IMAGE                                           COMMAND               CREATED        STATUS         PORTS                    NAMES
 cd063dff352d  registry.redhat.io/rhscl/httpd-24-rhel7:latest   /usr/bin/run-http...  8 minutes ago  Up 11 seconds  0.0.0.0:10000- >8000/tcp  rhel7-port-map
4. Stop the container and remove it:
 [user1@server30 ~]$ podman rm rhel7-port-map
 rhel7-port-map
5. Confirm the removal:
 [user1@server30 ~]$ podman ps -a
CONTAINER ID IMAGE COMMAND CREATED STATUS PORTS NAMESpodman command allows multiple variables to be passed or set with the -e option.EXAM TIP: Use the -e option with each variable that you want to pass or set.
1. Launch a container with an interactive terminal session and inject variables HISTSIZE and SECRET as directed. Use the specified container image.
 [user1@server30 ~]$ podman run -it -e HISTSIZE -e SECRET="secret123" --name rhel9-env-vars ubi9
 Resolved "ubi9" as an alias (/etc/containers/registries.conf.d/001- rhel-shortnames.conf)
 Trying to pull registry.access.redhat.com/ubi9:latest...
 Getting image source signatures
 Checking if image destination supports signatures
 Copying blob cc296d75b612 done   |
 Copying config 159a1e6731 done   |
 Writing manifest to image destination
 Storing signatures
 [root@b587355b8fc1 /]#
2. Verify both variables using the echo command:
 [root@b587355b8fc1 /]# echo $HISTSIZE $SECRET
 1000 secret123
 [root@b587355b8fc1 /]#
3. Disconnect from the container, and stop and remove it:
 [user1@server30 ~]$ podman stop rhel9-env-vars
 rhel9-env-vars
 [user1@server30 ~]$ podman rm rhel9-env-vars
 rhel9-env-vars
Confirm the deletion:
 [user1@server30 ~]$ podman ps -a
CONTAINER ID IMAGE COMMAND CREATED STATUS PORTS NAMESEXAM TIP: Proper ownership, permissions, and SELinux file type must be set to ensure persistent storage is accessed and allows data writes without issues.
1. Create a directory called /host_data, set full permissions on it, and confirm:
 [user1@server30 ~]$ sudo mkdir /host_data
 [sudo] password for user1:
 [user1@server30 ~]$ sudo chmod 777 /host_data/
 [user1@server30 ~]$ ll -d /host_data/
 drwxrwxrwx. 2 root root 6 Aug  1 22:59 /host_data/
2. Launch a root container called rhel9-persistent-data in interactive mode using the latest ubi9 image. Specify the attachment point (/container_data) to be used inside the container for the host directory (/host_data) Ensure the SELinux type container_file_t is automatically set on the directory and files within.
 [user1@server30 ~]$ sudo podman run --name rhel9-persistent-data -v  /host_data:/container_data:Z -it ubi9
 Resolved "ubi9" as an alias (/etc/containers/registries.conf.d/001- rhel-shortnames.conf)
 Trying to pull registry.access.redhat.com/ubi9:latest...
 Getting image source signatures
 Checking if image destination supports signatures
 Copying blob cc296d75b612 done   |
 Copying config 159a1e6731 done   |
 Writing manifest to image destination
 Storing signatures
3. Confirm the presence of the directory inside the container with ls on /container_data:
 [root@e8711892370f /]# ls -ldZ /container_data
 drwxrwxrwx. 2 root root  system_u:object_r:container_file_t:s0:c376,c965 6 Aug  2 05:59  /container_data
4. Create a file called testfile with the echo command under /container_data:
[root@e8711892370f /]# echo "This is persistent storage." > /container_data/testfile5. Verify the file creation and the SELinux type on it:
 [root@e8711892370f /]# ls -lZ /container_data/
 total 4
 -rw-r--r--. 1 root root  system_u:object_r:container_file_t:s0:c376,c965 28 Aug  2 06:03  testfile
6. Exit out of the container and check the presence of the file in the host directory:
 [root@e8711892370f /]# exit
 exit
 [user1@server30 ~]$ ls -lZ /host_data/
 total 4
 -rw-r--r--. 1 root root  system_u:object_r:container_file_t:s0:c376,c965 28 Aug  1 23:03  testfile
7. Stop and remove the container:
 [user1@server30 ~]$ sudo podman stop rhel9-persistent-data
 rhel9-persistent-data
 [user1@server30 ~]$ sudo podman rm rhel9-persistent-data
 rhel9-persistent-data
8. Launch a new root container called rhel8-persistent-data in interactive mode using the latest ubi8 image from any of the defined registries. Specify the attachment point (/container_data2) to be used inside the container for the host directory (/host_data). Ensure the SELinux type container_file_t is automatically set on the directory and files within.
 [user1@server30 ~]$ sudo podman run -it --name rhel8-persistent-data -v /host_data:/container_data2:Z ubi8
 Resolved "ubi8" as an alias (/etc/containers/registries.conf.d/001- rhel-shortnames.conf)
 Trying to pull registry.access.redhat.com/ubi8:latest...
 Getting image source signatures
 Checking if image destination supports signatures
 Copying blob 8694db102e5b done   |
 Copying config 269749ad51 done   |
 Writing manifest to image destination
 Storing signatures
9. Confirm the presence of the directory inside the container with ls on /container_data2:
 [root@af6773299c7e /]# ls -ldZ /container_data2/
 drwxrwxrwx. 2 root root  system_u:object_r:container_file_t:s0:c198,c914 22 Aug  2 06:03  /container_data2/
 [root@af6773299c7e /]# ls -lZ /container_data2/
 total 4
 -rw-r--r--. 1 root root  system_u:object_r:container_file_t:s0:c198,c914 28 Aug  2 06:03  testfile
 [root@af6773299c7e /]# cat /container_data2/testfile
 This is persistent storage.
10. Create a file called testfile2 with the echo command under /container_data2:
 [root@af6773299c7e /]# echo "This is persistent storage2." >  /container_data2/testfile2

 [root@af6773299c7e /]# ls -lZ /container_data2/
 total 8
 -rw-r--r--. 1 root root  system_u:object_r:container_file_t:s0:c198,c914 28 Aug  2 06:03  testfile
 -rw-r--r--. 1 root root  system_u:object_r:container_file_t:s0:c198,c914 29 Aug  2 06:10  testfile2
11. Exit out of the container and confirm the existence of both files in the host directory:
 [root@af6773299c7e /]# exit
 exit

 [user1@server30 ~]$ ls -lZ /host_data/
 total 8
 -rw-r--r--. 1 root root  system_u:object_r:container_file_t:s0:c198,c914 28 Aug  1 23:03  testfile
 -rw-r--r--. 1 root root  system_u:object_r:container_file_t:s0:c198,c914 29 Aug  1 23:10  testfile2
12. Stop and remove the container using the stop and rm subcommands:
 [user1@server30 ~]$ sudo podman stop rhel8-persistent-data
 rhel8-persistent-data
 [user1@server30 ~]$ sudo podman rm rhel8-persistent-data
 rhel8-persistent-data
13. Re-check the presence of the files in the host directory:
 [user1@server30 ~]$ ll /host_data
 total 8
 -rw-r--r--. 1 root root 28 Aug  1 23:03 testfile
-rw-r--r--. 1 root root 29 Aug 1 23:10 testfile2Multiple containers run on a single host and it becomes a challenging task to change their operational state or delete them manually.
In RHEL 9, these administrative functions can be automated via the systemd service
There are several steps that need to be completed to configure container state management via systemd.
These steps vary for rootful and rootless container setups and include the creation of service unit files and their storage in appropriate directory locations (~/.config/systemd/user for rootless containers and /etc/systemd/system for rootful containers).
Once setup and enabled, the containers will start and stop automatically as a systemd service with the host state transition or manually with the systemctl command.
The podman command to start and stop containers is no longer needed if the systemd setup is in place.
You may experience issues if you continue to use podman for container state transitioning alongside.
The start and stop behavior for rootless containers differs slightly from that of rootful containers.
For the rootless setup, the containers are started when the relevant user logs in to the host and stopped when that user logs off from all their open terminal sessions;
However, this default behavior can be altered by enabling lingering for that user with the loginctl command.
User lingering is a feature that, if enabled for a particular user, spawns a user manager for that user at system startup and keeps it running in the background to support long-running services configured for that user.
The user need not log in.
EXAM TIP: Make sure that you use a normal user to launch rootless containers and the root user (or sudo) for rootful containers.
systemctl command to verify the automatic container start, stop, and deletion.1. Launch a new container called rootful-container in detached mode using the latest ubi9:
 [user1@server30 ~]$ sudo podman run -dt --name rootful-container ubi9
 [sudo] password for user1:
 0ed04dcedec418068acd14c864e95e78f56a38dd57d2349cf2c46b0de1a1bf1b
2. Confirm the new container using podman ps. Note the container ID.
 [user1@server30 ~]$ sudo podman ps
 CONTAINER ID  IMAGE                                   COMMAND      CREATED         STATUS         PORTS       NAMES
 0ed04dcedec4  registry.access.redhat.com/ubi9:latest  /bin/bash   20  seconds ago  Up 20 seconds              rootful-container
3. Create (generate) a service unit file called rootful-container.service under /etc/systemd/system while ensuring that the next new container that will be launched based on this configuration file will not require the source container to work. The tee command will show the generated file content on the screen as well as store it in the specified file.
 [user1@server30 ~]$ sudo podman generate systemd --new --name  rootful-container | sudo tee /etc/systemd/system/rootful-qcontainer.service

 [Unit]
 Description=Podman container-rootful-container.service
 Documentation=man:podman-generate-systemd(1)
 Wants=network-online.target
 After=network-online.target
 RequiresMountsFor=%t/containers

 [Service]
 Environment=PODMAN_SYSTEMD_UNIT=%n
 Restart=on-failure
 TimeoutStopSec=70
 ExecStart=/usr/bin/podman run \
	--cidfile=%t/%n.ctr-id \
	--cgroups=no-conmon \
	--rm \
	--sdnotify=conmon \
	--replace \
	-dt \
	--name rootful-container ubi9
 ExecStop=/usr/bin/podman stop \
	--ignore -t 10 \
	--cidfile=%t/%n.ctr-id
 ExecStopPost=/usr/bin/podman rm \
	-f \
	--ignore -t 10 \
	--cidfile=%t/%n.ctr-id
 Type=notify
 NotifyAccess=all

 [Install]
WantedBy=default.target4. Stop and delete the source container (rootful-container):
 [user1@server30 ~]$ sudo podman stop rootful-container
 [sudo] password for user1:
 WARN[0010] StopSignal SIGTERM failed to stop container rootful- container in 10 seconds, resorting to SIGKILL
 rootful-container

 [user1@server30 ~]$ sudo podman rm rootful-container
 rootful-container
Verify the removal by running sudo podman ps -a:
 [user1@server30 ~]$ sudo podman ps -a
 CONTAINER ID  IMAGE       COMMAND     CREATED     STATUS      PORTS       NAMES
5. Update systemd to bring the new service under its control (reboot the system if required):
[user1@server30 ~]$ sudo systemctl daemon-reload6. Enable and start the container service:
 [user1@server30 ~]$ sudo systemctl enable --now rootful-container
 Created symlink /etc/systemd/system/default.target.wants/rootful- container.service → /etc/systemd/system/rootful-container.service.
7. Check the running status of the new service:
 [user1@server30 ~]$ sudo systemctl status rootful-container
 rootful-container.service - Podman container-rootful-container.s>
     Loaded: loaded (/etc/systemd/system/rootful-container.service>
     Active: active (running)
8. Verify the launch of a new container (compare the container ID with that of the source root container):
 [user1@server30 ~]$ sudo podman ps
 CONTAINER ID  IMAGE                                   COMMAND      CREATED             STATUS             PORTS       NAMES
 440a57c26186  registry.access.redhat.com/ubi9:latest  /bin/bash    About a minute ago  Up About a minute              rootful-container
9. Restart the container service using the systemctl command:
 [user1@server30 ~]$ sudo systemctl restart rootful-container
 sudo systemctl status rootful-

 [user1@server30 ~]$ sudo systemctl status rootful-container
 rootful-container.service - Podman container-rootful-container.s>
     Loaded: loaded (/etc/systemd/system/rootful-container.service>
     Active: active (running)
10. Check the status of the container again. Observe the removal of the previous container and the launch of a new container (compare container IDs).
 [user1@server30 ~]$ sudo podman ps
 CONTAINER ID  IMAGE                                   COMMAND      CREATED         STATUS             PORTS       NAMES
0a980537b83a registry.access.redhat.com/ubi9:latest /bin/bash 59 seconds ago Up About a minute rootful-containersystemctl command as conuser1 to verify the automatic container start, stop, and deletion.1. Create a user account called conuser1 and assign a simple password:
 [user1@server30 ~]$ sudo useradd conuser1

 [user1@server30 ~]$ echo conuser1 | sudo passwd -- stdin conuser1
 Changing password for user conuser1.
 passwd: all authentication tokens updated  successfully.
2. Open a new terminal window on server20 and log in as conuser1. Create directory ~/.config/systemd/user to store a service unit file:
[conuser1@server30 ~]$ mkdir ~/.config/systemd/user -p3. Launch a new container called rootless-container in detached mode using the latest ubi8:
 [conuser1@server30 ~]$ podman run -dt --name  rootless-container ubi8
 Resolved "ubi8" as an alias  (/etc/containers/registries.conf.d/001-rhel- shortnames.conf)
 Trying to pull  registry.access.redhat.com/ubi8:latest...
 Getting image source signatures
 Checking if image destination supports signatures
 Copying blob 8694db102e5b done   |
 Copying config 269749ad51 done   |
 Writing manifest to image destination
 Storing signatures
 381d46ae9a3e11723c3bde35090782129e6937c461f8c2621bc9725f6b9efc27
4. Confirm the new container using podman ps. Note the container ID.
 [conuser1@server30 ~]$ podman ps
 CONTAINER ID  IMAGE                                   COMMAND     CREATED         STATUS         PORTS       NAMES
 381d46ae9a3e  registry.access.redhat.com/ubi8:latest  /bin/bash   27 seconds ago  Up 27 seconds              rootless-container
5. Create (generate) a service unit file called rootless-container.service under ~/.config/systemd/user while ensuring that the next new container that will be launched based on this configuration will not require the source container to work:
 [conuser1@server30 ~]$ podman generate systemd --new --name rootless-container >  ~/.config/systemd/user/rootless-container.service

 DEPRECATED command:
 It is recommended to use Quadlets for running  containers and pods under systemd.

 Please refer to podman-systemd.unit(5) for details.
6. Display the content of the unit file:
 [conuser1@server30 ~]$ cat  ~/.config/systemd/user/rootless-container.service
 # container-rootless-container.service
 # autogenerated by Podman 4.9.4-rhel
 # Thu Aug  1 23:42:11 MST 2024

 [Unit]
 Description=Podman container-rootless- container.service
 Documentation=man:podman-generate-systemd(1)
 Wants=network-online.target
 After=network-online.target
 RequiresMountsFor=%t/containers

 [Service]
 Environment=PODMAN_SYSTEMD_UNIT=%n
 Restart=on-failure
 TimeoutStopSec=70
 ExecStart=/usr/bin/podman run \
	--cidfile=%t/%n.ctr-id \
	--cgroups=no-conmon \
	--rm \
	--sdnotify=conmon \
	--replace \
	-dt \
	--name rootless-container ubi8
 ExecStop=/usr/bin/podman stop \
	--ignore -t 10 \
	--cidfile=%t/%n.ctr-id
 ExecStopPost=/usr/bin/podman rm \
	-f \
	--ignore -t 10 \
	--cidfile=%t/%n.ctr-id
 Type=notify
 NotifyAccess=all

 [Install]
 WantedBy=default.target
7. Stop and delete the source container rootless-container using the stop and rm subcommands:
 [conuser1@server30 ~]$ podman stop rootless-container
 rootless-container

 [conuser1@server30 ~]$ podman rm rootless-container
 rootless-container
Verify the removal by running podman ps -a:
 [conuser1@server30 ~]$ podman ps -a
 CONTAINER ID  IMAGE       COMMAND     CREATED      STATUS      PORTS       NAMES
8. Update systemd to bring the new service to its control
[conuser1@server30 ~]$ systemctl --user daemon-reload9. Enable and start the container service:
 [conuser1@server30 ~]$ systemctl --user enable --now rootless-container.service
 Created symlink  /home/conuser1/.config/systemd/user/default.target.wa nts/rootless-container.service →  /home/conuser1/.config/systemd/user/rootless- container.service.
10. Check the running status of the new service:
 conuser1@server30 ~]$ systemctl --user status  rootless-container
 rootless-container.service - Podman container- rootless-container>
     Loaded: loaded (/home/conuser1/.config/systemd/user/rootless->
     Active: active (running)
11. Verify the launch of a new container (compare the container ID with that of the source rootless container):
 [conuser1@server30 ~]$ podman ps
 CONTAINER ID  IMAGE                                   COMMAND     CREATED             STATUS              PORTS       NAMES
 57f946085605  registry.access.redhat.com/ubi8:latest  /bin/bash   About a minute ago  Up About a minute              rootless-container
12. Enable the container service to start and stop with host transition using the loginctl command (systemd login manager) and confirm:
 [conuser1@server30 ~]$ loginctl enable-linger
 [conuser1@server30 ~]$ loginctl show-user conuser1 | grep -i linger
 Linger=yes
13. Restart the container service using the systemctl command:
 [conuser1@server30 ~]$ systemctl --user restart  rootless-container
 [conuser1@server30 ~]$ systemctl --user status  rootless-container
 rootless-container.service - Podman container- rootless-container>
     Loaded: loaded  (/home/conuser1/.config/systemd/user/rootless->
     Active: active (running)
14. Check the status of the container again. Observe the removal of the previous container and the launch of a new container (compare container IDs).
 [conuser1@server30 ~]$ podman ps
 CONTAINER ID  IMAGE                                   COMMAND     CREATED         STATUS         PORTS       NAMES
4dec33db41b5 registry.access.redhat.com/ubi8:latest /bin/bash 41 seconds ago Up 41 seconds rootless-container [root@se
-bash: 3: command not found
rver30 ~]# adduser conadm
[root@server30 ~]# visudo conadm ALL=(ALL) ALL [root@server30 ~]# dnf install container-tools
[root@server30 ~]# podman login registry.redhat.io
[conuser1@server30 ~]$ podman pull ubi9
Resolved "ubi9" as an alias (/etc/containers/registries.conf.d/001-rhel- shortnames.conf)
Trying to pull registry.access.redhat.com/ubi9:latest...
Getting image source signatures
Checking if image destination supports signatures
Copying blob cc296d75b612 done |
Copying config 159a1e6731 done |
Writing manifest to image destination
Storing signatures 159a1e67312ef50059357047ebe2a365afea904504fca9561abb3 85ecd942d62
[conuser1@server30 ~]$ podman inspect ubi9 sudo podman run -it --name rootful-cont-port -p 80:8080 ubi9ls, pwd, df, cat /etc/redhat-release, and os-release while in the container. [root@349163a6e431 /]# ls
afs boot etc lib lost+found mnt proc run srv tmp var
bin dev home lib64 media opt root sbin sys usr
[root@349163a6e431 /]# pwd
/
[root@349163a6e431 /]# df -hT
Filesystem Type Size Used Avail Use% Mounted on
overlay overlay 17G 4.3G 13G 26% /
tmpfs tmpfs 64M 0 64M 0% /dev
shm tmpfs 63M 0 63M 0% /dev/shm
tmpfs tmpfs 356M 6.0M 350M 2% /etc/hosts
devtmpfs devtmpfs 4.0M 0 4.0M 0% /proc/keys
[root@349163a6e431 /]# cat /etc/redhat-release
Red Hat Enterprise Linux release 9.4 (Plow) [conadm@server30 ~]$ sudo podman port rootful-cont- port
8080/tcp -> 0.0.0.0:80 [conadm@server30 ~]$ podman run -d -e VAR1="lab1" -e VAR2="lab2" --name variables8 ubi8 [root@803642faea28 /]# echo $VAR1
lab1
[root@803642faea28 /]# echo $VAR2
lab2 [conadm@server30 ~]$ sudo mkdir /host_perm1
[sudo] password for conadm:
[conadm@server30 ~]$ sudo chmod 777 /host_perm1
[conadm@server30 ~]$ sudo touch /host_perm1/str1 [conadm@server30 ~]$ sudo podman run --name rootless-cont-str -v /host_perm1:/cont_perm1:Z -it ubi8
[root@a1326200eae1 /]# [root@a1326200eae1 /]# ls /cont_perm1
str1 [root@a1326200eae1 cont_perm1]# mkdir permdir2
[root@a1326200eae1 cont_perm1]# ls
permdir2 str1
[root@a1326200eae1 cont_perm1]# exit
exit
[conadm@server30 ~]$ [conadm@server30 ~]$ sudo ls /host_perm1
permdir2 str1 [conadm@server30 ~]$ podman stop rootless-cont-str
rootless-cont-str
[conadm@server30 ~]$ podman rm rootless-cont-str
rootless-cont-str [conadm@server30 ~]$ sudo rm -r /host_perm1 [conadm@server30 ~]$ podman run --name rootless-cont-adv -v ~/host_perm2:/cont_perm2:Z -e HISTSIZE="100" -e MYNAME="RedHat" -p 9000:8080 -it --replace ubi8
[root@79e965cd1436 /]# [root@79e965cd1436 /]# echo $HISTSIZE
100
[root@79e965cd1436 /]# echo $MYNAME
RedHat
[root@79e965cd1436 /]# ls -ld /cont_perm2
drwxrwxrwx. 2 root root 6 Aug 4 02:16 /cont_perm2
[conadm@server30 ~]$ podman port rootless-cont-adv
8080/tcp -> 0.0.0.0:9000 [root@5d510a1b2293 /]# exit
exit
[conadm@server30 ~]$ [conadm@server30 ~]$ podman run --name rootless-cont-adv -v ~/host_perm2:/cont_perm2:Z -e HISTSIZE="100" -e MYNAME="RedHat" -p 9000:8080 -dt --replace ubi8
da8faf434813242985b8e332dc06b0e6da78e7125bc36579ffc8d82b0bcafb8e
[conadm@server30 ~]$ podman generate systemd --new --name rootless-cont-adv > ~/.config/systemd/user/rootless-container.service
DEPRECATED command:
It is recommended to use Quadlets for running containers and pods under systemd.
Please refer to podman-systemd.unit(5) for details. [conadm@server30 ~]$ podman stop rootless-cont-adv
rootless-cont-adv
[conadm@server30 ~]$ podman rm rootless-cont-adv
rootless-cont-adv [conadm@server30 ~]$ systemctl --user daemon-reload
[conadm@server30 user]$ systemctl --user enable -- now rootless-container.service
Created symlink /home/conadm/.config/systemd/user/default.target.want s/rootless-container.service → /home/conadm/.config/systemd/user/rootless- container.service. [conadm@server30 user]$ loginctl enable-linger
[conadm@server30 user]$ loginctl show-user conadm | grep -i linger
Linger=yes[root@rhcsa3 ~]# systemctl --user --machine=conadm@ list-units --type=service
UNIT LOAD ACTIVE SUB DESCRIPTION >
dbus-broker.service loaded active running D-Bus User Message Bus
rootless-cont-adv.service loaded active running Podman container-rootl>
systemd-tmpfiles-setup.service loaded active exited Create User's Volatile>
LOAD = Reflects whether the unit definition was properly loaded.
ACTIVE = The high-level unit activation state, i.e. generalization of SUB.
SUB = The low-level unit activation state, values depend on unit type.
3 loaded units listed. Pass --all to see loaded but inactive units, too.
To show all installed unit files use 'systemctl list-unit-files'.
[root@rhcsa3 ~]# sudo -i -u conadm podman ps -a
CONTAINER ID IMAGE COMMAND CREATED STATUS PORTS NAMES
a48fd2c25be4 registry.access.redhat.com/ubi9:latest /bin/bash 10 minutes ago Up 10 minutes 0.0.0.0:9000->8080/tcp rootless-cont-adv [root@server30 ~]# podman generate systemd --new -- name rootful-cont-port | tee /etc/systemd/system/rootful-cont-port.service
DEPRECATED command:
It is recommended to use Quadlets for running containers and pods under systemd.
Please refer to podman-systemd.unit(5) for details.
# container-rootful-cont-port.service
# autogenerated by Podman 4.9.4-rhel
# Sat Aug 3 20:49:32 MST 2024
[Unit]
Description=Podman container-rootful-cont- port.service
Documentation=man:podman-generate-systemd(1)
Wants=network-online.target
After=network-online.target
RequiresMountsFor=%t/containers
[Service]
Environment=PODMAN_SYSTEMD_UNIT=%n
Restart=on-failure
TimeoutStopSec=70
ExecStart=/usr/bin/podman run \
--cidfile=%t/%n.ctr-id \
--cgroups=no-conmon \
--rm \
--sdnotify=conmon \
-d \
--replace \
-it \
--name rootful-cont-port \
-p 80:8080 ubi9
ExecStop=/usr/bin/podman stop \
--ignore -t 10 \
--cidfile=%t/%n.ctr-id
ExecStopPost=/usr/bin/podman rm \
-f \
--ignore -t 10 \
--cidfile=%t/%n.ctr-id
Type=notify
NotifyAccess=all
[Install]
WantedBy=default.target [root@server30 ~]# podman stop rootful-cont-port
WARN[0010] StopSignal SIGTERM failed to stop container rootful-cont-port in 10 seconds, resorting to SIGKILL
rootful-cont-port
[root@server30 ~]# podman ps
CONTAINER ID IMAGE COMMAND CREATED STATUS PORTS NAMES
fe0d07718dda registry.access.redhat.com/ubi9:latest /bin/bash 16 minutes ago Up 16 minutes rootful-container
[root@server30 ~]# podman rm rootfil-cont-port
Error: no container with ID or name "rootfil-cont- port" found: no such container
[root@server30 ~]# podman rm rootful-cont-port
rootful-cont-port [root@server30 ~]# systemctl daemon-reload
[root@server30 ~]# systemctl enable --now rootful- cont-port
Created symlink /etc/systemd/system/default.target.wants/rootful- cont-port.service → /etc/systemd/system/rootful-cont- port.service. [root@server30 ~]# reboot
[root@server30 ~]# podman ps
CONTAINER ID IMAGE COMMAND CREATED STATUS PORTS NAMES
5c030407a7d6 registry.access.redhat.com/ubi9:latest /bin/bash About a minute ago Up About a minute 0.0.0.0:80- >8080/tcp rootful-cont-port
9d1e8a429ac6 registry.access.redhat.com/ubi9:latest /bin/bash About a minute ago Up About a minute rootful-container
[root@server30 ~]# [conadm@server30 ~]$ vim containerfile FROM registry.access.redhat.com/ubi8/ubi:latest
RUN useradd -ms /bin/bash -u 1001 user-in-container
USER 1001 [conadm@server30 ~]$ podman image build -f containerfile --no-cache -t ubi8-user .
STEP 1/3: FROM registry.access.redhat.com/ubi8/ubi:latest
STEP 2/3: RUN useradd -ms /bin/bash -u 1001 user-in- container
--> b330095e91eb
STEP 3/3: USER 1001
COMMIT ubi8-user
--> e8cde30fc020
Successfully tagged localhost/ubi8-user:latest
e8cde30fc020051caa2a4e2f58aaaf90f088709462a1314b936fd608facfdb5e [conadm@server30 ~]$ podman run -ti --name test12 ubi8-user
[user-in-container@30558ffcb227 /]$