Subsections of Networking
Consoling in to MX80 from linux
Plug console cable in
find out what your serial line name is:
Open putty > change to serial > change the tty line name
Make sure your serial settings are correct
https://www.juniper.net/documentation/us/en/hardware/mx5-mx10-mx40-mx80/topics/task/management-devices-mx5-mx10-mx40-mx80-connecting.html
Press open > when terminal appears press enter
Juniper Password recovery
ttps://www.juniper.net/documentation/en_US/junos/topics/task/configuration/authentication-root-password-recovering-mx80.html
https://www.juniper.net/documentation/us/en/software/junos/junos-install-upgrade/topics/topic-map/rescue-and-recovery-config-file.html#load-commit-configuration
accidentally deleted the wrong line in Juniper.conf file ? failing over to juniper.conf
https://www.juniper.net/documentation/en_US/junos/topics/concept/junos-configuration-files.html
DNS
DNS and Name Resolution
- DNS is also referred to as BIND (Berkeley Internet Name Domain)
- An implementation of DNS,
- Most popular DNS application in use.
- Name resolution is the technique that uses DNS/BIND for hostname lookups.
DNS Name Space and Domains
- DNS name space is a
- Hierarchical organization of all the domains on the Internet.
- Root of the name space is represented by a period (.)
- Hierarchy below the root (.) denotes the top-level domains (TLDs) with names such as .com, .net, .edu, .org, .gov, .ca, and .de.
- A DNS domain is a collection of one or more systems. Subdomains fall under their parent domains and are separated by a period (.).
root of the name space is represented by a period ( - redhat.com is a second-level subdomain that falls under .com, and bugzilla.redhat.com is a third-level subdomain that falls under redhat.com.
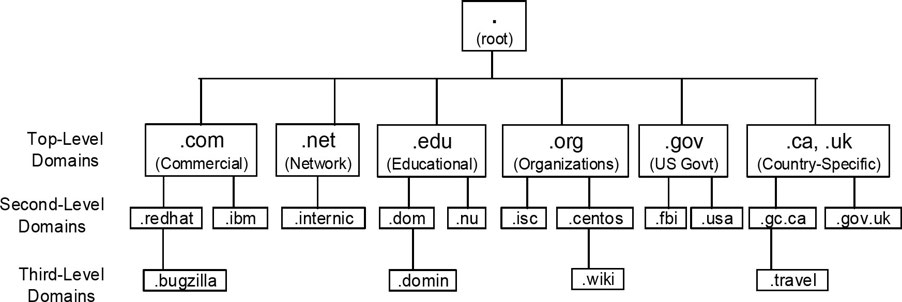
- Deepest level of the hierarchy are the leaves (systems, nodes, or any device with an IP address) of the name space.
- a network switch net01 in .travel.gc.ca subdomain will be known as net01.travel.gc.ca.
- If a period (.) is added to the end of this name to look like net01.travel.gc.ca., it will be referred to as the Fully Qualified Domain Name (FQDN) for net01.
DNS Roles
A DNS system or nameserver can be a
- primary server
- secondary server
- or client
Primary server
- Responsible for its domain (or subdomain).
- Maintains a master database of all the hostnames and their associated IP addresses that are included in that domain.
- All changes in the database are done on this server.
- Each domain must have one primary server with one or more optional secondary servers for load balancing and redundancy.
Secondary server
- Stores an updated copy of the master database.
- Provide name resolution service in the event the primary server goes down.
Client
- Queries nameservers for name lookups.
- DNS client on Linux involves two text files.
/etc/resolv.conf
- DNS resolver configuration file where information to support hostname lookups is defined.
- May be edited manually with a text editor.
- Referenced by resolver utilities to construct and transmit queries.
Key directives
-
domain
-
nameserver
-
search
Directive Description
domain
- Identifies the default domain name to be searched for queries
nameserver
- Declares up to three DNS server IP addresses to be queried one at a time in the order in which they are listed. Nameserver entries may be defined as separate line items with the directive or on a single line.
search
- Specifies up to six domain names, of which the first must be the local domain. No need to define the domain directive if the search directive is used.
Sample entry
  domain                              example.com

  search                              example.net example.org example.edu example.gov

  nameserver                          192.168.0.1 8.8.8.8 8.8.4.4
Variation
  domain                              example.com

  search                              example.net example.org example.edu example.gov

  nameserver                          192.168.0.1

  nameserver                          8.8.8.8

  nameserver                          8.8.4.4
- Entries are automatically placed by the NetworkManager service.
[root@server30 tmp]# cat /etc/resolv.conf
# Generated by NetworkManager
nameserver 2001:578:3f::30
nameserver 2001:578:3f:1::30
- If this file is absent, the resolver utilities only query the nameserver configured on the localhost, determine the domain name from the hostname of the system, and construct the search path based on the domain name.
Viewing and Adjusting Name Resolution Sources and Order
/etc/nsswitch.conf
-
Directs the lookup utilities to the correct source to get hostname information.
-
Also identifies the order in which to consult source and an action to be taken next.
-
Four keywords oversee this behavior
- success
- notfoundq
- unavail
- tryagain
Keyword Meaning Default Action
success
- Information found in return (do not try the source and provided to next source) the requester.
notfound
- Information not found continue (try the next in source source).
unavail
- Source down or not continue (try the next responding; service source) disabled or not configured.
tryagain
- Source busy, retry continue (try the next later source).
Example shows two sources for name resolution: files (/etc/hosts) and DNS (/etc/resolv.conf).
- Default behavior
- Search will terminate if the requested information is found in the hosts table.
Instruct the lookup programs to return if the requested information is not found there:
hosts:files [notfound=return] dns
- Query tools available in RHEL 9:
dig command (domain information groper)
- DNS lookup utility.
- Queries the nameserver specified at the command line or consults the resolv.conf file to determine the nameservers to be queried.
- May be used to troubleshoot DNS issues due to its flexibility and verbosity.
To get the IP for redhat.com using the nameserver listed in the resolv.conf file:
[root@server10 ~]# dig redhat.com

; <<>> DiG 9.16.23-RH <<>> redhat.com
;; global options: +cmd
;; Got answer:
;; ->>HEADER<<- opcode: QUERY, status: NOERROR, id: 9017
;; flags: qr rd ra; QUERY: 1, ANSWER: 2, AUTHORITY: 0, ADDITIONAL: 1

;; OPT PSEUDOSECTION:
; EDNS: version: 0, flags:; udp: 4000
;; QUESTION SECTION:
;redhat.com.			IN	A

;; ANSWER SECTION:
redhat.com.		3599	IN	A	52.200.142.250
redhat.com.		3599	IN	A	34.235.198.240

;; Query time: 94 msec
;; SERVER: 172.16.10.150#53(172.16.10.150)
;; WHEN: Fri Jul 19 13:12:13 MST 2024
;; MSG SIZE  rcvd: 71
To perform a reverse lookup on the redhat.com IP (52.200.142.250), use the -x option with the command:
[root@server10 ~]# dig -x 52.200.142.250

; <<>> DiG 9.16.23-RH <<>> -x 52.200.142.250
;; global options: +cmd
;; Got answer:
;; ->>HEADER<<- opcode: QUERY, status: NOERROR, id: 23057
;; flags: qr rd ra; QUERY: 1, ANSWER: 1, AUTHORITY: 0, ADDITIONAL: 1

;; OPT PSEUDOSECTION:
; EDNS: version: 0, flags:; udp: 4000
;; QUESTION SECTION:
;250.142.200.52.in-addr.arpa.	IN	PTR

;; ANSWER SECTION:
250.142.200.52.in-addr.arpa. 299 IN	PTR	ec2-52-200-142-250.compute-1.amazonaws.com.

;; Query time: 421 msec
;; SERVER: 172.16.10.150#53(172.16.10.150)
;; WHEN: Fri Jul 19 14:22:52 MST 2024
;; MSG SIZE  rcvd: 112
host Command
- Works on the same principles as the
dig command in terms of nameserver determination.
- Produces less data in the output by default.
- -v option if you want more info.
Perform a lookup on redhat.com:
[root@server10 ~]# host redhat.com
redhat.com has address 34.235.198.240
redhat.com has address 52.200.142.250
redhat.com mail is handled by 10 us-smtp-inbound-2.mimecast.com.
redhat.com mail is handled by 10 us-smtp-inbound-1.mimecast.com.
Rerun with -v added:
[root@server10 ~]# host -v redhat.com
Trying "redhat.com"
;; ->>HEADER<<- opcode: QUERY, status: NOERROR, id: 28687
;; flags: qr rd ra; QUERY: 1, ANSWER: 2, AUTHORITY: 0, ADDITIONAL: 0

;; QUESTION SECTION:
;redhat.com.			IN	A

;; ANSWER SECTION:
redhat.com.		3127	IN	A	52.200.142.250
redhat.com.		3127	IN	A	34.235.198.240

Received 60 bytes from 172.16.1.19#53 in 8 ms
Trying "redhat.com"
;; ->>HEADER<<- opcode: QUERY, status: NOERROR, id: 47268
;; flags: qr rd ra; QUERY: 1, ANSWER: 0, AUTHORITY: 1, ADDITIONAL: 0

;; QUESTION SECTION:
;redhat.com.			IN	AAAA

;; AUTHORITY SECTION:
redhat.com.		869	IN	SOA	dns1.p01.nsone.net. hostmaster.nsone.net. 1684376201 200 7200 1209600 3600

Received 93 bytes from 172.16.1.19#53 in 5 ms
Trying "redhat.com"
;; ->>HEADER<<- opcode: QUERY, status: NOERROR, id: 61563
;; flags: qr rd ra; QUERY: 1, ANSWER: 2, AUTHORITY: 0, ADDITIONAL: 12

;; QUESTION SECTION:
;redhat.com.			IN	MX

;; ANSWER SECTION:
redhat.com.		3570	IN	MX	10 us-smtp-inbound-1.mimecast.com.
redhat.com.		3570	IN	MX	10 us-smtp-inbound-2.mimecast.com.

;; ADDITIONAL SECTION:
us-smtp-inbound-1.mimecast.com.	270 IN	A	205.139.110.242
us-smtp-inbound-1.mimecast.com.	270 IN	A	170.10.128.242
us-smtp-inbound-1.mimecast.com.	270 IN	A	170.10.128.221
us-smtp-inbound-1.mimecast.com.	270 IN	A	170.10.128.141
us-smtp-inbound-1.mimecast.com.	270 IN	A	205.139.110.221
us-smtp-inbound-1.mimecast.com.	270 IN	A	205.139.110.141
us-smtp-inbound-2.mimecast.com.	270 IN	A	170.10.128.221
us-smtp-inbound-2.mimecast.com.	270 IN	A	205.139.110.141
us-smtp-inbound-2.mimecast.com.	270 IN	A	205.139.110.221
us-smtp-inbound-2.mimecast.com.	270 IN	A	205.139.110.242
us-smtp-inbound-2.mimecast.com.	270 IN	A	170.10.128.141
us-smtp-inbound-2.mimecast.com.	270 IN	A	170.10.128.242

Received 297 bytes from 172.16.10.150#53 in 12 ms
Perform a reverse lookup on the IP of redhat.com with verbosity:
[root@server10 ~]# host -v 52.200.142.250
Trying "250.142.200.52.in-addr.arpa"
;; ->>HEADER<<- opcode: QUERY, status: NOERROR, id: 62219
;; flags: qr rd ra; QUERY: 1, ANSWER: 1, AUTHORITY: 0, ADDITIONAL: 0

;; QUESTION SECTION:
;250.142.200.52.in-addr.arpa.	IN	PTR

;; ANSWER SECTION:
250.142.200.52.in-addr.arpa. 300 IN	PTR	ec2-52-200-142-250.compute-1.amazonaws.com.

Received 101 bytes from 172.16.10.150#53 in 430 ms
nslookup Command
- Queries the nameservers listed in the resolv.conf file or specified at the command line.
- See man pages for interactive mode
Get the IP for redhat.com using nameserver 8.8.8.8 instead of the nameserver defined in resolv.conf:
[root@server10 ~]# nslookup redhat.com 8.8.8.8
Server:		8.8.8.8
Address:	8.8.8.8#53

Non-authoritative answer:
Name:	redhat.com
Address: 34.235.198.240
Name:	redhat.com
Address: 52.200.142.250
Perform a reverse lookup on the IP of redhat.com using the nameserver from the resolver configuration file:
[root@server10 ~]# nslookup 52.200.142.250
250.142.200.52.in-addr.arpa	name = ec2-52-200-142-250.compute-1.amazonaws.com.

Authoritative answers can be found from:
getent Command
- Fetch matching entries from the databases defined in the nsswitch.conf file.
- Reads the corresponding database and displays the information if found.
- For name resolution, use the hosts database and
getent will attempt to resolve the specified hostname or IP address.
Run the following for forward and reverse lookups:
[root@server10 ~]# getent hosts redhat.com
34.235.198.240  redhat.com
52.200.142.250  redhat.com
[root@server10 ~]# getent hosts 34.235.198.240
34.235.198.240  ec2-34-235-198-240.compute-1.amazonaws.com
Hostname
- “-”, “_ “, and “. " characters are allowed.
- Up to 253 characters.
- Stored in /etc/hostname.
- Can be viewed with several different commands, such as
hostname, hostnamectl, uname, and nmcli, as well as by displaying the content of the /etc/hostname file.
View the hostname:
Lab: Change the Hostname
Server1
- Open /etc/hostname and change the entry to server10.example.com
- restart the systemd-hostnamed service daemon
sudo systemctl restart systemd-hostnamed
- confirm
server2
- Change the hostname with hostnamectl:
sudo hostnamectl set-hostname server21.example.com
-
Log out and back in for the prompt to update
-
Change the hostname using nmcli
nmcli general hostname server20.example.com
How to Study for the CCNA Exam
It took me a whopping 2 years to finish my CCNA! I kept giving up and quitting my studies for months at a time. Why? Because I couldn’t remember the massive amount of content covered in the CCNA. It felt hopeless. I could have done it in 6 month (or faster) if I knew how to study.
I hadn’t taken a test in 10 years before this. So I had completely forgotten how to learn. This post is about the mistakes I made studying for the CCNA and how to avoid them.
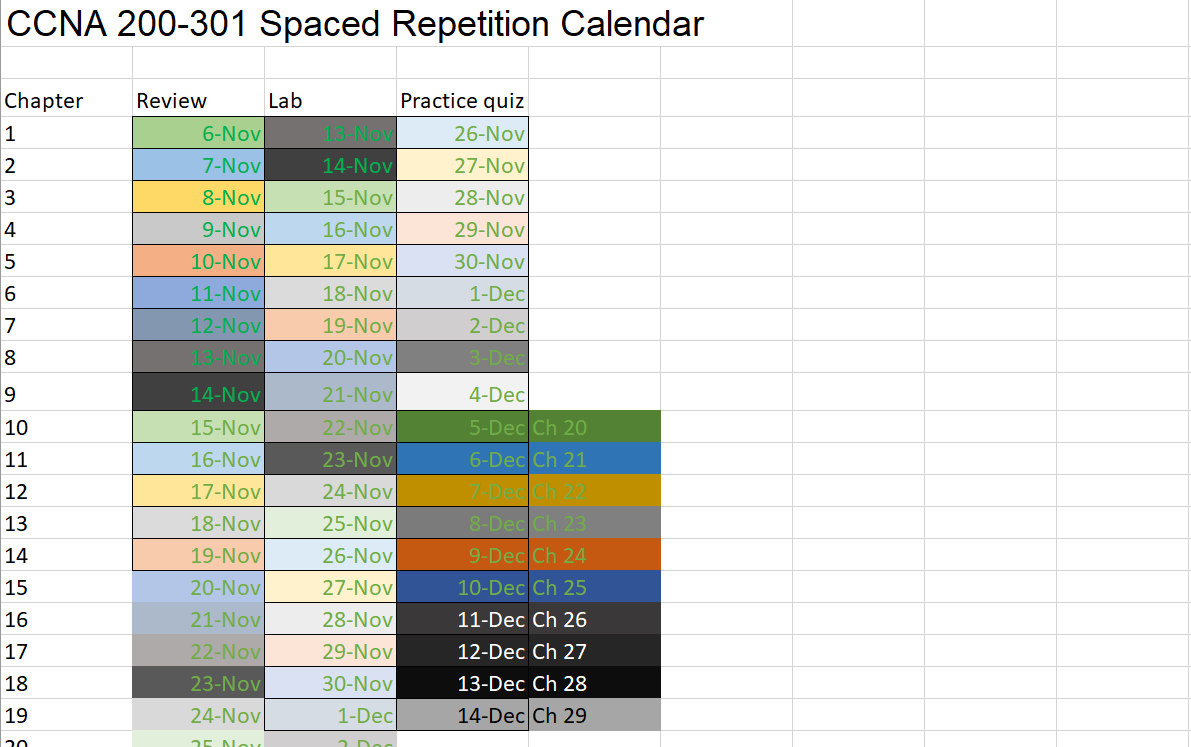
You will also learn, as I did, about spaced repetition. I’ve also included a 6 month CCNA spaced repetition calendar.
My Mistakes, So You Don’t Make Them
Mistake #1 Didn’t start flashcards until the final 30 days
I wish I would have started flashcards from day 1. This would have helped a crap ton. Remembering all of the little details is not only useful for taking the test. It embeds the concepts in your brain and keeps you processing how things work .
If there is anything you take from this list. You should definitely be doing some flashcards every day.
Mistake #2 Not enough labs as I went.
While studying the OCG and video courses. I did some labs. But I also skipped a ton of labs because it wasn’t convenient at the time. Then I was forced to lab every single topic in the final 30 days. A lot of cramming was done..
Make sure to do all of the labs as you go. Make up your own labs as well. This is very important to building job worthy skills.
Mistake #3 Didn’t have a plan or stick with it.
When your plan consists of, “just read everything and watch the videos and take the test when you feel ready”, you tend to procrastinate and put things off. Make a study schedule and a solid plan. (See below)
Having a set date for when you will take the test was pretty motivating. I did not find this out until about 30 days until my test.
Spaced Repetition
If you are using Anki flashcards for your studies, you may already be using spaced repetition. Spaced repetition is repeatedly reviewing with the time in between reviews getting longer each time you review it.
Here is an excellent article about our learning curves and why spaced repetition helps us remember things https://fs.blog/spacing-effect/
How to set up a spaced repetition calendar for CCNA.
Step 1. Plan how long your studies will take
Figure out how long you need. It usually takes around 240 hours of studying for CCNA. (Depending on experience). Then figure out how many hours per day that you can spend on studying. This example is based on a 6 month study calendar.
You can use this 6 month excel calendar to plan and track your progress. You. can still use this method If you have already been studying CCNA. Just edit your calendar for how much time you have left.
The calendar is also based on Wendel Odom’s Official Cert Guide. You will also want to mix your other resources into your reviews.
Decide what your review sessions will be
Plan to review each chapter 3-4 times. here is what I did for review sessions to pass the exam.
Review 1 Read and highlight (and flashcards)
- Read the chapter. Highlight key information that you want to remember.
- Do a lab for the material you studied (if applicable)
- Answer DIKTA questions
- Start Chapter 1 Anki Flascards
Review 2 Copy highlights over to OneNote (keep doing flashcards)
- Copy your highlights over to OneNote. (using copy and paste if you have the digital book)
- Read your highlights and make sure you understand everything.
- lab and continue doing flashcards. (just go through Anki suggested flashcards, not just ones for the specific chapter.)
Review 3 Labs and Highlight your notes (and flashcards)
- More labs!
- Go over your notes. Color coding everything. (You can find my jumbled note mess here)
- Green: Read again
- Teal: Very important Learn this/ lab it.
- Red/ purple: make extra flashcards out of this.
Review 4 Practice questions and review
- Go through and answer the DIKTA questions again. Review any missed answers.
- Lab anything you aren’t quite sure of.
The final 30 days
I HIGHLY recommend Boson ExSim for your final 30 days of studying. ExSim comes with 3 exams (A,B, and C). Start with exam A in test simulation mode. Leave about a week in between each practice exam so you can go over your answers and Boson’s explanations for each answer.
One week before your test, (after you’ve completed exams A,B, and C). Do a random exam. Make sure you do the timed version that don’t show your score as you go.
You should be scoring above 900 by your 3rd and 4th exam if you have been reviewing Boson’s answer explanations.
Schedule your exam
Pearson view didn’t let me schedule the exam past 30 days out from when I wanted to take it. I’m not sure if this is the case all the time. But by the time you are 30 days out you should have your test scheduled. This will light the fire under you. Great motivation for the home stretch.
If your exam is around June during Cisco Live, Cisco usually offers a 50% discount for an exam voucher. You probably won’t find any other discounts unless you pay for Cisco’s specific CCNA training.
Final word on labs
You can technically pass the CCNA without doing many labs. But this will leave you at a HUGE disadvantage in the job market. Labs are crucial for really understanding networking. Knowing your way around the CLI and being able to troubleshoot networking issues will make you stand out from those who crammed for the exam.
If you’ve made it this far I really appreciate you taking the time to read this post. I really hope it helps at least one person.
Juniper CLI Basics
Connection Methods
Factory default login:
User: root
No password
Fxpo
Ethernet management interface
SSH, FTP. Telnet, http(s)
Cannot route traffic and is used for management purposes only.
Initial Login
Logging for the First Time
• Nonroot users are placed into the CLI automatically
• Root user SSH login requires explicit config
router (ttyu0)
Serial console
login :
user
Password:
- JUNOS 15.1X49-DIOO.6 built 2017-06-28 07:33:31 UTC
• The root user must start the CLI from the shell
• Remember to exit the root shell after logging out of the CLI!
router (ttyuO)
- JUNOS 15.1X49-DIOO
2017-06-28
UTC
login:
Password:
root@router>
.6 built
cli
Shell Prompt
CLI Prompt “>
CLI Modes
configure
Configure mode . New candidate config file
Configure mode with a private candidate file
Other users logged in will not make changes to this file
Private Files comitted are merged into active config
Whoever commits last wins if there are matching commands
Can’t commit until you are at the top of the configuration (in private mode)
Locks config database
Can be killed by admin
No other user can edit config while you are in this mode
(edit) top
Goes back to the top of the configuration tree
Candidate Config Files
commit
Turns candidate config file into active
Warning will show if candidate config is already being edited
Commiting Configurations
Rollback files are last three Active configurations and stored in /config/(the current active are stored here as well)
4-49 are stores in /var/config/
Shows timestamp for the last time the file was active
rollback 1
Places rollback file one into the candidate config, must commit to make it active
CLI Help, Auto complete
Can type ? To show available commands
#> Show version brief
Show version info, hostname, and model
#>Configure
goes into configure mode
set system host-name hostname
set’s hostname
delete system host-name
deletes set hostname
edit routing-options static
edit routing options mode
exit
exit
Junos will let you know that config hasn’t been committed and ask if you want to commit
rollback 0
throwaway all changes to active candidate
#> help topic routing-options static
shows info page for topic specified
#> help references routing-options static
syntax and hierarchy of commands
Keyboard Shortcuts
Command completion
Space
auto complete commands built into system, Does not autocomplete things you named
tab
autocomplete user defined commands in the system
?
will show user defined options for autocomplete as well
Navigating Configuration Mode
When you go into config mode the running config is copied into a candidate file that you will be working on
show
if in configure mode, displays the entire candidate configuration
edit
similar to cd
edit protocols ospf
goes to the protocols/ospf heirarchy config mode
if you run show commend it will show the contents of hierarchy from wherever you are.
top
goes to the top of the hierarchy. Like cd to / in Linux
must be at the top to commit changes
show protocols ospf
selects which part of the hierarchy to show
will only see this if you are above the option you want to show in the hierarchy
can bypass this with:
top show routing-options static
same thing happens with the edit command
top edit routing-options
same fix
Editing, Renaming, and Comparing Configuration
up
moves up one level in the hierarchy
there is a protion in this video wioth vlan and interface configuration, come back if this isn’t covered elsewhere
up 2
jump up 2 levels
rollback ?
shows all the rollback files on the system
run show system uptime
run is like “do” in cisco, can run command from anywhere
rollback 1
rolls config back to rollback 1 file
show | compare
show things to be removed added with - or +
exit
Also brings you to the top of config file
Replace, Copy, or annotate Configuration
copy ge-0/0/1 to ge-0/0/2
makes a copy of the config
show ge-0/0/0
edit ge-0/0/0
Edit interfaces mode
#(int) replace pattern 0.101 with 200.102
Replaces the pattern of the ip address
#(int) replace pattern /24 with /25
Replace mask
If using replace commands don’t commit the config without running the #top show | compare command to verify. You may have run the compare command from one place.
top edit protocols ospf
Go into ospf edit
deactivate interface ge-0/0/0.0
Remove interface from ospf
annotate interface ge-0/0/0 “took down due to flapping”
C style programming comment
Load merge Configuration
run file list
ls -l basically
run file show top-int-config
Display contents of top-int-config
Paste Config on a Juniper Switch
cli
top
delete
configure
load set terminal
ctrl+shift +D to exit
commit check
commit and-quit
Juniper command equivalent to Cisco commands
Basic CLI and Systems Management
Commands
clock set > set date
reload > request system reboot
show history > show cli history
show logging > show log messages | last
show processes > show system processes
show running config > show configuration
show users > show system users
show version > show version | show chassis hardware
trace > traceroute
Switching Commands
show ethernet-switching interfaces
show spanning-tree > show spanning-tree bridge
show mac address-table > show ethernet-switching table
OSPF Commands
show ip ospf database > show ospf database
show ip ospf interface > show ospf interface
show ip ospf neighbor > show ospf neighbor
Routing Protocol-Independent Commands
clear arp-cache > clear arp
show arp > show arp
show ip route > show route
show ip route summary > show route summary
show route-map > show policy | policy-name
show tcp > show system connections
Interface Commands
clear counters > clear interface statistics
show interfaces > show interfaces
show interfaces detail > show interfaces extensive
show ip interface brief > show interfaces terse
Networking Network Devices and Network Connections
Hostname
- “-”, “_ “, and “. " characters are allowed.
- Up to 253 characters.
- Stored in /etc/hostname.
- Can be viewed with several different commands, such as
hostname, hostnamectl, uname, and nmcli, as well as by displaying the content of the /etc/hostname file.
View the hostname:
Lab: Change the Hostname
Server1
- Open /etc/hostname and change the entry to
server10.example.com
- Restart the
systemd-hostnamed service daemon
sudo systemctl restart systemd-hostnamed
- confirm
server2
- Change the hostname with hostnamectl:
sudo hostnamectl set-hostname server21.example.com
-
Log out and back in for the prompt to update
-
Change the hostname using nmcli
nmcli general hostname server20.example.com
Hardware and IP Addressing
Ethernet Address
- 48-bit address that is used to identify the correct destination node for data packets transmitted from the source node.
- The data packets include hardware addresses for the source and the destination node.
- Also referred to as the hardware, physical, link layer, or MAC address.
List all network interfaces with their ethernet addresses:
Subnetting
- Network address space is divided into several smaller and more manageable logical subnetworks (subnets).
- Benefits:
- Reduced network traffic
- Improved network performance
- de-centralized and easier administration
- uses the node bits only
- Results in the reduction of usable addresses.
- All nodes in a given subnet have the same subnet mask.
- Each subnet acts as an isolated network and requires a router to talk to other subnets.
- The first and the last IP address in a subnet are reserved. The first address points to the subnet itself, and the last address is the broadcast address.
IPv4
View current ipv4 address:
Classful Network Addressing
See Classful ipv4
IPv6 Address
See ipv6
The ip addr command also shows IPv6 addresses for the interfaces:
[root@server200 ~]# ip addr
1: lo: <LOOPBACK,UP,LOWER_UP> mtu 65536 qdisc noqueue state UNKNOWN group default qlen 1000
    link/loopback 00:00:00:00:00:00 brd 00:00:00:00:00:00
    inet 127.0.0.1/8 scope host lo
       valid_lft forever preferred_lft forever
    inet6 ::1/128 scope host
       valid_lft forever preferred_lft forever
2: enp0s3: <BROADCAST,MULTICAST,UP,LOWER_UP> mtu 1500 qdisc fq_codel state UP group default qlen 1000
    link/ether 08:00:27:b9:4e:ef brd ff:ff:ff:ff:ff:ff
    inet 172.16.1.155/20 brd 172.16.15.255 scope global dynamic noprefixroute enp0s3
       valid_lft 79061sec preferred_lft 79061sec
    inet6 fe80::a00:27ff:feb9:4eef/64 scope link noprefixroute
       valid_lft forever preferred_lft forever
Tools:
ping6traceroute6tracepath6
Protocols
- Defined in /etc/protocols
- Well known ports are defined in /etc/services
cat /etc/protocols
TCP and UDP Protocols
See IP Transport and Applications and tcp_ip_basic
ICMP
Send two pings to server 20
Ping the server’s loopback interface:
Send a traceroute to server 20
Or:
ICMPv6
- IPv6 version of ICMP
- enabled by default
Ping and ipv6 address:
Trace a route to an IPv6 address:
Show IPv6 addresses:
Network Manager Service
Default service in RHEL for network:
- interface and connection configuration.
- Administration.
- Monitoring.
NetworkManager daemon
- Responsible for keeping interfaces and connection up and active.
- Includes:
nmclinmtui (text-based)nm-connection-editor (GUI)
- Does not manage loopback interfaces.
Interface Connection Profiles
-
Configuration file on each interface that defines IP assignments and other relevant parameters for it.
-
The networking subsystem reads this file and applies the settings at the time the connection is activated.
-
Connection configuration files (or connection profiles) are stored in a central location under the /etc/NetworkManager/system-connections directory.
-
The filenames are identified by the interface connection names with nmconnection as the extension.
-
Some instances of connection profiles are: enp0s3.nmconnection, ens160.nmconnection, and em1.nmconnection.
On server10 and server20, the device name for the first interface is enp0s3 with connection name enp0s3 and relevant connection information stored in the enp0s3.nmconnection file.
This connection was established at the time of RHEL installation. The current content of the file from server10 are presented below:
[root@server200 system-connections]# cat /etc/NetworkManager/system-connections/enp0s3.nmconnection
[connection]
id=enp0s3
uuid=45d6a8ea-6bd7-38e0-8219-8c7a1b90afde
type=ethernet
autoconnect-priority=-999
interface-name=enp0s3
timestamp=1710367323

[ethernet]

[ipv4]
method=auto

[ipv6]
addr-gen-mode=eui64
method=auto

[proxy]
- Each section defines a set of networking properties for the connection.
Directives
id
- Any description given to this connection. The default matches the interface name.
uuid
- The UUID associated with this connection
type
- Specifies the type of this connection
autoconnect-priority
- If the connection is set to autoconnect, connections with higher priority will be preferred. A higher number means higher priority. The range is between -999 and 999 with 0 being the default.
interface_name
- Specifies the device name for the network interface
timestamp
- The time, in seconds since the Unix Epoch that the connection was last activated successfully. This field is automatically populated each time the connection is activated.
address1/method
- Specifies the static IP for the connection if the method property is set to manual. /24 represents the subnet mask.
addr-gen-mode/method
- Generates an IPv6 address based on the hardware address of the interface.
View additional directives:
Naming rules for devices are governed by udevd service based on:
- Device location
- Topology
- setting in firmware
- virtualization layer
Understanding Hosts Table
See DNS and Time Synchronization
/etc/hosts file
- Table used to maintain hostname to IP mapping for systems on the local network, allowing us to access a system by simply employing its hostname.
Each row in the file contains an IP address in column 1 followed by the official (or canonical) hostname in column 2, and one or more optional aliases thereafter.
EXAM TIP: In the presence of an active DNS with all hostnames resolvable, there is no need to worry about updating the hosts file.
As expressed above, the use of the hosts file is common on small networks, and it should be updated on each individual system to reflect any changes for best inter-system connectivity experience.
Networking DIY Challenge Labs
Lab: Update Hosts Table and Test Connectivity.
- Add both server10 and server20’s interfaces to both server’s /etc/host files:
192.168.0.110  server10.example.com  server10 <-- This is an alias
192.168.0.120  server20.example.com  server20
172.10.10.110  server10s8.example.com   server10s8
172.10.10.120  server20s8.example.com   server20s8
- Send 2 packets from server10 to server20’s IP address:
- Send 2 pings from server10 to server20’s hostname:
- Add a third network interface to rhel9server40 in VirtualBox.
- As user1 with sudo on server40, run
ip a and verify the addition of the new interface.
- Use the
nmcli command and assign IP 192.168.0.40/24 and gateway 192.168.0.1
[root@server40 ~]# nmcli c a type Ethernet ifname enp0s8 con-name enp0s8 ip4 192.168.0.40/24 gw4 192.168.0.1
- Deactivate and reactivate this connection manually.
[root@server40 ~]# nmcli c d enp0s8
Connection 'enp0s8' successfully deactivated (D-Bus active path: /org/freedesktop/NetworkManager/ActiveConnection/3)

[root@server40 ~]# nmcli c s
NAME    UUID                                  TYPE      DEVICE
enp0s3  6e75a5e4-869b-3ed1-bdc4-c55d2d268285  ethernet  enp0s3
lo      66809437-d3fa-4104-9777-7c3364b943a9  loopback  lo
enp0s8  9a32e279-84c2-4bba-b5c5-82a04f40a7df  ethernet  --
[root@server40 ~]# nmcli c u enp0s8
Connection successfully activated (D-Bus active path: /org/freedesktop/NetworkManager/ActiveConnection/4)

[root@server40 ~]# nmcli c s
NAME    UUID                                  TYPE      DEVICE
enp0s3  6e75a5e4-869b-3ed1-bdc4-c55d2d268285  ethernet  enp0s3
enp0s8  9a32e279-84c2-4bba-b5c5-82a04f40a7df  ethernet  enp0s8
lo      66809437-d3fa-4104-9777-7c3364b943a9  loopback  lo
- Add entry server40 to server30’s hosts table.
[root@server30 ~]# vim /etc/hosts
[root@server30 ~]# ping server40
PING server40.example.com (192.168.0.40) 56(84) bytes of data.
64 bytes from server40.example.com (192.168.0.40): icmp_seq=1 ttl=64 time=3.20 ms
64 bytes from server40.example.com (192.168.0.40): icmp_seq=2 ttl=64 time=0.628 ms
64 bytes from server40.example.com (192.168.0.40): icmp_seq=3 ttl=64 time=0.717 ms
^C
--- server40.example.com ping statistics ---
3 packets transmitted, 3 received, 0% packet loss, time 2009ms
rtt min/avg/max/mdev = 0.628/1.516/3.204/1.193 ms
Add a third network interface to RHEL9server30 in VirtualBox.
run ip a and verify the addition of the new interface.
Use the nmcli command and assign IP 192.168.0.30/24 and gateway 192.168.0.1
nmcli c a type Ethernet ifname enp0s8 con-name enp0s8 ip4 192.168.0.30/24 gw4 192.168.0.1
Deactivate and reactivate this connection manually. Add entry server30 to the hosts table of server 40
[root@server30 system-connections]# nmcli c d enp0s8
Connection 'enp0s8' successfully deactivated (D-Bus active path: /org/freedesktop/NetworkManager/ActiveConnection/3)

[root@server30 system-connections]# nmcli c u enp0s8
Connection successfully activated (D-Bus active path: /org/freedesktop/NetworkManager/ActiveConnection/4)

/etc/hosts

192.168.0.30 server30.example.com server30
ping tests to server30 from server 40
[root@server40 ~]# ping server30
PING server30.example.com (192.168.0.30) 56(84) bytes of data.
64 bytes from server30.example.com (192.168.0.30): icmp_seq=1 ttl=64 time=1.59 ms
64 bytes from server30.example.com (192.168.0.30): icmp_seq=2 ttl=64 time=0.474 ms
^C
--- server30.example.com ping statistics ---
2 packets transmitted, 2 received, 0% packet loss, time 999ms
rtt min/avg/max/mdev = 0.474/1.032/1.590/0.558 ms
Or create the profile manually and restart network manager:
[connection]
id=enp0s8
type=ethernet
interface-name=enp0s8
uuid=92db4c65-2f13-4952-b81f-2779b1d24a49

[ethernet]

[ipv4]
method=manual
address1=10.1.13.3/24,10.1.13.1

[ipv6]
addr-gen-mode=default
method=auto

[proxy]
ip
- Display monitor and manage network interfaces, routing, connections, traffic, etc.
ifup
ifdown
nmcli
- Creates, updates, deletes, activates, and deactivates a connection profile.
nmcli command
- Create, view, modify, remove, activate, and deactivate network connections.
- Control and report network device status.
- Supports abbreviation of commands.
Operates on 7 different object categories.
- general
- networking
- connection (c)(con)
- device (d)(dev)
- radio
- monitor
- agent
[root@server200 system-connections]# nmcli --help
Usage: nmcli [OPTIONS] OBJECT { COMMAND | help }

OPTIONS
  -a, --ask                                ask for missing parameters
  -c, --colors auto|yes|no                 whether to use colors in output
  -e, --escape yes|no                      escape columns separators in values
  -f, --fields <field,...>|all|common      specify fields to output
  -g, --get-values <field,...>|all|common  shortcut for -m tabular -t -f
  -h, --help                               print this help
  -m, --mode tabular|multiline             output mode
  -o, --overview                           overview mode
  -p, --pretty                             pretty output
  -s, --show-secrets                       allow displaying passwords
  -t, --terse                              terse output
  -v, --version                            show program version
  -w, --wait <seconds>                     set timeout waiting for finishing operations

OBJECT
  g[eneral]       NetworkManager\'s general status and operations
  n[etworking]    overall networking control
  r[adio]         NetworkManager radio switches
  c[onnection]    NetworkManager\'s connections
  d[evice]        devices managed by NetworkManager
  a[gent]         NetworkManager secret agent or polkit agent
  m[onitor]       monitor NetworkManager changes
3. connection
- Activates, deactivates, and administers network connections.
Options:
show (list connections)up/down (Brings connection up or down)add(a) (adds a connection)edit (edit connection or add a new one)modify (modify properties of a connection)delete(d) (delete a connection)reload (re-read all connection profiles)load (re-read a connection profile)
4. Device
Options:
status (Displays device status)show (Displays info about device(s)
Show all connections, inactive or active:
Deactivate the connection enp0s8:
Note:
The connection profile gets detached from the device, disabling the connection.
Activate the connection enp0s8:
$ sudo nmcli c up enp0s8
# connection profile re-attaches to the device.
Display the status of all network devices:
Lab: Add Network Devices to server10 and one to server20 using VirtualBox
- Shut down your servers (follow each step for both servers)
- Add network interface in Virtualbox then power on the VMs
Select machine > settings > Network > Adapter 2 > Enable Network Adapter > Internal Network > ok
- Verify the new interfaces:
- Verify the interface that was added from virtualbox:
nmcli d status | grep enp
- Add connection profile and attach it to the interface:
sudo nmcli c a type Ethernet ifname enp0s8 con-name enp0s8 ip4 172.10.10.120/24 gw4 172.10.10.1
- Confirm connection status
nmcli d status | grep enp
- Verify ip address
- Check the content of the connection profile
cat /etc/NetworkManager/system-connections/enp0s8.nmconnection
Resources for Passing CCNA
There are a lot of great CCNA resources out there. This list does not include all of them. Only the ones that I personally used to pass the CCNA 200-301 exam.
Materials for CCNA are generally separated into 5 categories:
- Books
- Video courses
- Labs
- Practice test
- Flashcards
Books
Wendell Odom OCG Official cert guide library
To me, this is the king of CCNA study materials. Some people do not like reading but this will give you more depth than any other resource on this list. Link.
Todd Lammle Books
Yes, I read both the OCG and Todd Lammle books cover to cover. No, I do not recommend doing this. Todd has a great way of adding humor into networking. If you need to build up your networking from the ground up. These books are great. Link.
Video Courses
CBT Nuggets
Jeremy Ciara makes learning networking so much fun. This was a great course but is not enough for you to pass the exam on it’s own. Also, a CBT nuggets monthly subscription will set you back $59 per month. Link.
Jeremy’s IT Lab
Jermey’s IT lab course was the most informative for me. Jeremy is really great at explaining the more complex topics. Jeremy’s course also includes Packet Tracer labs and and in depth Anki flashcard deck for free. Link.
Labs
David Bombal’s Packet Tracer Labs
These labs will really make you think. Although they do steer off the exam objectives a bit. Link.
Jeremy’s IT labs
These were my favorite labs by far. Very easy to set up with clear instructions and video explanations. Link.
Practice test
Boson Exsim
I can’t stress this enough. if there is one resource that you invest some money into. it’s the Boson practice exams. This is a test simulator that is very close to what the actual test will be like. Exsim comes with 3 exams.
After taking one of these practice tests you will get a breakdown of your scores per category. You will also get to go through all of your questions and see detailed explantations for why each answer is right or wrong.
These practice exams were crucial for me to understand where my knowledge gaps were. Link.
Subnettingpractice.com
You can learn subnetting pretty good. Then forget some of the steps a month later and have to learn all over again. It was very helpful to go over some of these subnetting questions once in a while. Link.
Flashcards
Anki Deck
These are the only flashcards I used. It is very nice not to have to create your own flashcards. Having the Anki app on your phone is very convenient. You can study whenever you have a few minutes of downtime.
Anki also used spaced-repetition. It will give you harder flashcards more often based on how you rate their difficulty.
This particular deck goes along with the OCG. You can filter by chapter and add more as you get through the book.
I will be using Anki flashcards for every exam in the future. Link.
My Top 3
Be careful not to use too many resources. You may get a bit overwhelmed. Especially if this is your first certification like it was for me. You will be building study habits and learning how to read questions correctly. So focus on quality over quantity.
If I had to study for the CCNA again, I would use these three resources:
- OCG
- Boson Exsim
- Anki Flashcards
If you like these posts, please let me know so i can keep making more like them!
Time Synchronization
Network Time Protocol (NTP)
- Networking protocol for synchronizing the system clock with remote time servers for accuracy and reliability.
- Having steady and exact time on networked systems allows time-sensitive applications, such as authentication and email applications, backup and scheduling tools, financial and billing systems, logging and monitoring software, and file and storage sharing protocols, to function with precision.
- Sends a stream of messages to configured time servers and binds itself to the one with least amount of delay in its responses, the most accurate, and may or may not be the closest distance-wise.
- Client system maintains a drift in time in a file and references this file for gradual drop in inaccuracy.
Chrony
- RHEL 9 implementation of NTP
- Uses the UDP port 123.
- If enabled, it starts at system boot and continuously operates to keep the system clock in sync with a more accurate source of time.
- Performs well on computers that are occasionally connected to the network, attached to busy networks, do not run all the time, or have variations in temperature.
Chrony is the RHEL implementation of NTP. And it operates on UDP port 123. If you enable it, it starts at system boot and continuously monitors system time and keeps in in sync.
Time Sources
- A time source is any reference device that acts as a provider of time to other devices.
- The most precise sources of time are the atomic clocks.
- They use Universal Time Coordinated (UTC) for time accuracy.
- They produce radio signals that radio clocks use for time propagation to computer servers and other devices that require correctness in time.
- When choosing a time source for a network, preference should be given to the one that takes the least amount of time to respond.
- This server may or may not be closest physically.
The common sources of time employed on computer networks are:
- The local system clock
- Internet-based public time server
- Radio clock.
local system clock
- Can be used as a provider of time.
- This requires the maintenance of correct time on the server either manually or automatically via cron.
- Keep in mind that this server has no way of synchronizing itself with a more reliable and precise external time source.
- Using the local system clock as a time server is the least recommended option.
Public time server
- Several public time servers are available over the Internet for general use (visit www.ntp.org for a list).
- These servers are typically operated by government agencies, research and scientific organizations, large software vendors, and universities around the world.
- One of the systems on the local network is identified and configured to receive time from one or more public time servers.
- Preferred over the use of the local system clock.
The official ntp.org site also provides a common pool called pool.ntp.org for vendors and organizations to register their own NTP servers voluntarily for public use.
Examples:
- rhel.pool.ntp.org and ubuntu.pool.ntp.org for distribution-specific pools,
- ca.pool.ntp.org and oceania.pool.ntp.org for country and continent/region-specific pools.
Under these sub-pools, the owners maintain multiple time servers with enumerated hostnames such as 0.rhel.pool.ntp.org, 1.rhel.pool.ntp.org, 2.rhel.pool.ntp.org, and so on.
Radio clock
- Regarded as the perfect provider of time
- Receives time updates straight from an atomic clock.
- Global Positioning System (GPS), WWVB, and DCF77 are some popular radio clock methods.
- A direct use of signals from these sources requires connectivity of some hardware to the computer identified to act as an organizational or site-wide time server.
NTP Roles
- A system can be configured to operate as a primary server, secondary server, peer, or client.
Primary server
- Gets time from a time source and provides time to secondary servers or directly to clients.
secondary server
- Receives time from a primary server and can be configured to furnish time to a set of clients to offload the primary or for redundancy.
- The presence of a secondary server on the network is optional but highly recommended.
peer
- Reciprocates time with an NTP server.
- All peers work at the same stratum level, and all of them are considered equally reliable.
client
- Receives time from a primary or a secondary server and adjusts its clock accordingly.
Stratum Levels
-
Time sources are categorized hierarchically into several levels that are referred to as stratum levels based on their distance from the reference clocks (atomic, radio, and GPS).
-
The reference clocks operate at stratum level 0 and are the most accurate provider of time with little to no delay.
-
Besides stratum 0, there are fifteen additional levels that range from 1 to 15.
-
Of these, servers operating at stratum 1 are considered perfect, as they get time updates directly from a stratum 0 device.
-
A stratum 0 device cannot be used on the network directly. It is attached to a computer, which is then configured to operate at stratum 1.
-
Servers functioning at stratum 1 are called time servers and they can be set up to deliver time to stratum 2 servers.
-
Similarly, a stratum 3 server can be configured to synchronize its time with a stratum 2 server and deliver time to the next lower-level servers, and so on.
-
Servers sharing the same stratum can be configured as peers to exchange time updates with one another.
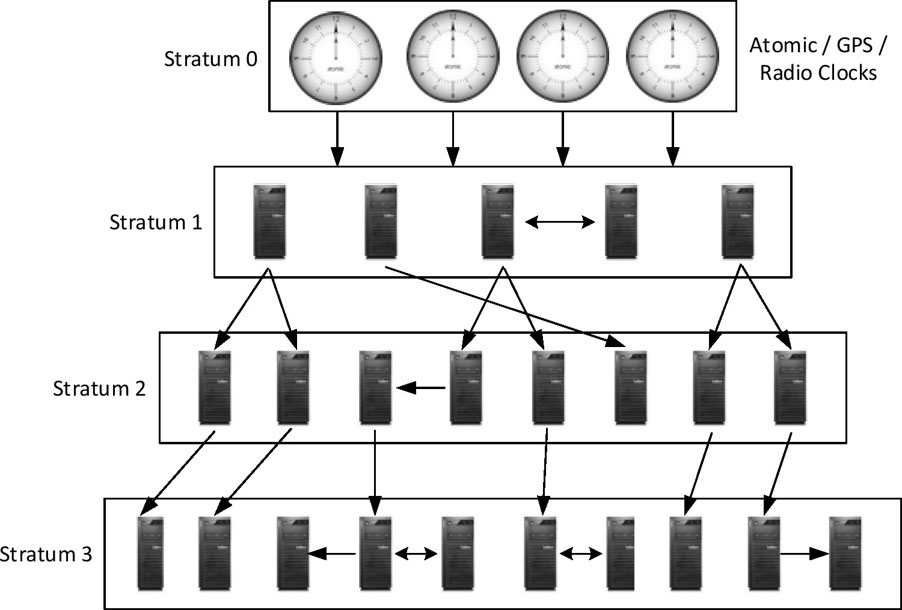
There are numerous public NTP servers available for free that synchronize time.
They normally operate at higher stratum levels such as 2 and 3.
Chrony Configuration File
/etc/chrony.conf
- key configuration file for the Chrony service
- Referenced by the Chrony daemon at startup to determine the sources to synchronize the clock, the log file location, and other details.
- Can be modified by hand to set or alter directives as required.
- Common directives used in this file along with real or mock values:
driftfile
- /var/lib/chrony/drift
- Indicates the location and name of the drift file to be used to record the rate at which the system clockgains or losses time. This data is used by Chrony to maintain local system clock accuracy.
logdir
- /var/log/chrony
- Sets the directory location to store the log files in
pool
- 0.rhel.pool.ntp.org iburst
- Defines the hostname that represents a pool of time servers. Chrony binds itself with one of the servers to get updates. In case of a failure of that server, it automatically switches the binding to another server within the pool.
- The iburst option dictates the Chrony service to send the first four update requests to the time server every 2 seconds. This allows the daemon to quickly bring the local clock closer to the time server at startup.
server
- server20s8.example.com iburst
- Defines the hostname or IP address of a single time server.
server
- 127.127.1.0
- The IP 127.127.1.0 is a special address that epitomizes the local system clock.
peer
- prodntp1.abc.net
- Identifies the hostname or IP address of a time server running at the same stratum level. A peer provides time to a server as well as receives time from the same server
man chrony.conf for details.
Chrony Daemon and Command
- Chrony service runs as a daemon program called chronyd that handles time synchronization in the background.
- Uses /etc/chrony.conf file at startup and sets its behavior accordingly.
- If the local clock requires a time adjustment, Chrony takes multiple small steps toward minimizing the gap rather than doing it abruptly in a single step.
The Chrony service has a command line program called chronyc.
chronyc command
- monitor the performance of the service and control its runtime behavior.
Subcommands:
sources
- List current sources of time
tracking
- view performance statistics
- Install the Chrony software package and activate the service without making any changes to the default configuration.
- Validate the binding and operation.
1. Install the Chrony package using the dnf command:
[root@server10 ~]# sudo dnf -y install chrony
2. Ensure that preconfigured public time server entries are present in the /etc/chrony.conf file:
[root@server1 ~]# grep -E 'pool|server' /etc/chrony.conf | grep -v ^#
pool 2.rhel.pool.ntp.org iburst
There is a single pool entry set in the file by default. This pool name is backed by multiple NTP servers behind the scenes.
3. Start the Chrony service and set it to autostart at reboots:
sudo systemctl --now enable chronyd
4. Examine the operational status of Chrony:
sudo systemctl status chronyd --no-pager -l
5. Inspect the binding status using the sources subcommand with chronyc:
[root@server1 ~]# chronyc sources
MS Name/IP address         Stratum Poll Reach LastRx Last sample
===============================================================================
^+ ntp7-2.mattnordhoffdns.n>     2   8   377   324  -3641us[-3641us] +/-   53ms
^* 2600:1700:4e60:b983::123      1   8   377   430   +581us[  +84us] +/-   36ms
^- 2600:1700:5a0f:ee00::314>     2   8   377    58  -1226us[-1226us] +/-   50ms
^- 2603:c020:6:b900:ed2f:b4>     2   9   377   320   +142us[ +142us] +/-   73ms
^ means the source is a server
* implies current association with the source.
Poll
- polling rate (6 means 64 seconds),
Reach
- reachability register (377 indicates a valid response was received),
Last sample
- how long ago the last sample was received, and the offset between the local clock and the source at the last measurement
6. Display the clock performance using the tracking subcommand with chronyc:
[root@server1 ~]# chronyc tracking
Reference ID    : 2EA39303 (2600:1700:4e60:b983::123)
Stratum         : 2
Ref time (UTC)  : Sun Jun 16 12:05:45 2024
System time     : 286930.187500000 seconds slow of NTP time
Last offset     : -0.000297195 seconds
RMS offset      : 2486.306152344 seconds
Frequency       : 3.435 ppm slow
Residual freq   : -0.034 ppm
Skew            : 0.998 ppm
Root delay      : 0.064471066 seconds
Root dispersion : 0.003769779 seconds
Update interval : 517.9 seconds
Leap status     : Normal
EXAM TIP: You will not have access to the outside network during the exam. You will need to point your system to an NTP server available on the exam network. Simply comment the default server/pool directive(s) and add a single directive “server <hostname>” to the file. Replace <hostname> with the NTP server name or its IP address as provided.
timedatectl command.
- Modify the date, time, and time zone.
- Outputs the local time, Universal time, RTC time (real-time clock, a battery-backed hardware clock located on the system board), time zone, and the status of the NTP service by default:
[root@server10 ~]# timedatectl
               Local time: Mon 2024-07-22 10:55:11 MST
           Universal time: Mon 2024-07-22 17:55:11 UTC
                 RTC time: Mon 2024-07-22 17:55:10
                Time zone: America/Phoenix (MST, -0700)
System clock synchronized: yes
              NTP service: active
          RTC in local TZ: no
- Requires that the NTP/Chrony service is deactivated in order to make time adjustments.
Turn off NTP and verify:
[root@server10 ~]# timedatectl set-ntp false
[root@server10 ~]# timedatectl | grep NTP
              NTP service: inactive
Modify the current date and confirm:
[root@server10 ~]# timedatectl set-time 2024-07-22

[root@server10 ~]# timedatectl
               Local time: Mon 2024-07-22 00:00:30 MST
           Universal time: Mon 2024-07-22 07:00:30 UTC
                 RTC time: Mon 2024-07-22 07:00:30
                Time zone: America/Phoenix (MST, -0700)
System clock synchronized: no
              NTP service: inactive
          RTC in local TZ: no
Change both date and time in one go:
[root@server10 ~]# timedatectl set-time "2024-07-22 11:00"

[root@server10 ~]# timedatectl
               Local time: Mon 2024-07-22 11:00:06 MST
           Universal time: Mon 2024-07-22 18:00:06 UTC
                 RTC time: Mon 2024-07-22 18:00:06
                Time zone: America/Phoenix (MST, -0700)
System clock synchronized: no
              NTP service: inactive
          RTC in local TZ: no
Reactivate NTP:
[root@server10 ~]# timedatectl set-ntp true

[root@server10 ~]# timedatectl | grep NTP
              NTP service: active
date command
- view or modify the system date and time.
View current date and time:
[root@server10 ~]# date
Mon Jul 22 11:03:00 AM MST 2024
Change the date and time:
[root@server10 ~]# date --set "2024-07-22 11:05"
Mon Jul 22 11:05:00 AM MST 2024
Return the system to the current date and time:
[root@server10 ~]# timedatectl set-ntp false
[root@server10 ~]# timedatectl set-ntp true
DNS and Time Sync DIY Labs
[root@server10 ~]# vim /etc/chrony.conf
-
Go to the end of the file, and add a new line “server 127.127.1.0”.
-
Start the Chrony service and run chronyc sources to confirm the binding.
[root@server10 ~]# systemctl restart chronyd

[root@server10 ~]# chronyc sources
MS Name/IP address         Stratum Poll Reach LastRx Last sample
===============================================================================
^? 127.127.1.0                   0   6     0     -     +0ns[   +0ns] +/-    0ns
Lab: Modify System Date and Time
- Execute the date and timedatectl commands to check the current system date and time.
[root@server10 ~]# date
Mon Jul 22 11:37:54 AM MST 2024

[root@server10 ~]# timedatectl
               Local time: Mon 2024-07-22 11:37:59 MST
           Universal time: Mon 2024-07-22 18:37:59 UTC
                 RTC time: Mon 2024-07-22 18:37:59
                Time zone: America/Phoenix (MST, -0700)
System clock synchronized: no
              NTP service: active
          RTC in local TZ: no
[root@server10 ~]# timedatectl set-time 2024-07-23
Failed to set time: Automatic time synchronization is enabled

[root@server10 ~]# timedatectl set-ntp false

[root@server10 ~]# timedatectl set-time "2024-07-23"
- Issue the
date command and change the system time to one hour ahead of the current time.
[root@server10 ~]# date -s "2024-07-22 12:41"
Mon Jul 22 12:41:00 PM MST 2024
- Observe the new date and time with both commands.
[root@server10 ~]# date -s "2024-07-22 12:41"
Mon Jul 22 12:41:00 PM MST 2024

[root@server10 ~]# date
Mon Jul 22 12:41:39 PM MST 2024
[root@server10 ~]# timedatectl
               Local time: Mon 2024-07-22 12:41:41 MST
           Universal time: Mon 2024-07-22 19:41:41 UTC
                 RTC time: Tue 2024-07-23 07:01:41
                Time zone: America/Phoenix (MST, -0700)
System clock synchronized: no
              NTP service: inactive
          RTC in local TZ: no
- Reset the date and time to the current actual time by disabling and re-enabling the NTP service using the
timedatectl command.
[root@server10 ~]# timedatectl set-ntp true
Toggle PoE on a Juniper Switch
Configure

set poe interface ge-0/0/0 disable

commit

rollback 1

commit
What to Learn After CCNA
It’s easy to get overwhelmed with options after completing your CCNA. What do you learn next? If you are trying to get a job as a Network Engineer, you will want to check this out.
I went through dozens of job listings that mentioned CCNA. Then, tallied up the main devices/vendors, certifications, and technologies mentioned. And left out anything that wasn’t mentioned more than twice.
Core CCNA technologies such as LAN, WAN, OSPF, Spanning Tree, VLANs, etc. have been left out. The point here is to target the most sought after technologies and skills by employers. I also left out soft skills and any job that wasn’t a networking specific role.
Devices/ Vendors
Palo Alto is huge! I’m not suprised by this. Depending on the company, a network engineer may be responsible for firewall configuration and troubleshooting. It also looks like Network Engineers with a wide variety of skills are saught after.
| Device/Vendor |
Times Mentioned |
| Palo Alto |
9 |
| Cisco ASA |
6 |
| Juniper |
6 |
| Office 365 |
5 |
| Meraki |
4 |
| Vmware |
4 |
| Linux |
4 |
| Ansible |
4 |
| AWS |
3 |
| Wireshark |
3 |
Technologies
Firewall comes in first again. Followed closely by VPN skills. Every interview I had for a Network Engineer position asked if I knew how to configure and troubleshoot VPNs.
| Technology |
Times Mentioned |
| Firewall |
19 |
| VPN |
16 |
| Wireless |
12 |
| BGP |
12 |
| Security |
12 |
| MPLS |
10 |
| Load balancers |
8 |
| Ipsec |
7 |
| ISE |
6 |
| DNS |
5 |
| SDWAN |
5 |
| Cloud |
4 |
| TACACS+ |
4 |
| ACL |
4 |
| SIEM |
4 |
| IDS/IPS |
4 |
| RADIUS |
3 |
| ITIL |
3 |
| Ipam |
3 |
| VOIP |
3 |
| EIGRP |
3 |
| Python |
3 |
Certifications
CCNP blew every other cert out of the water. Companies will be very interested if you are working towards this cert. Security + comes highly recommended as well.
| Certification |
Times Mentioned |
| CCNP |
18 |
| Security+ |
6 |
| JNCIA |
4 |
| JNCIP |
4 |
| Network + |
4 |
| CCIE |
4 |
| PCNSA |
3 |
So what do you do after CCNA?
It depends…
Are you trying to get a new job ASAP? Are there opportunities at your current role that you can use your new skills to leverage? Do you have some study time before you are ready to take the next step?
CCNP Enterprise is a good bet if you really want to stand out in Network Engineering interviews.
Don’t want to be a Network engineer?
Continue to build a good base of IT skills. This will open you up to a larger variety of jobs and open skill paths that you need a good foundation to unlock.
Core skills include:
- Linux/ Operating systems
- Networking
- General Cybersecurity
- Programming/ Scripting
A good Linux certification like the RHCSA would be great to learn more about Linux, scripting, and operating systems. Security + would be good if you want to get a solid foundation of cyber security. And Python skills will give you a gold star in any IT interview.
Don’t get paralyzed by choices.
Pick something that interests you and go for it. That is the only way to get it right. Doing what you enjoy is better than not doing anything at all because you can’t decide the best path.
Hopefully we can revisit this post after learning Python to get a much bigger sample size.